
Power Pivot Principles: Using SELECTCOLUMNS to Create Calendar Table
24 March 2020
Welcome back to the Power Pivot Principles blog. This week, we are going to learn a new way of using a DAX function to create a calendar table.
In last week’s blog, we introduced a method of using the DAX function ADDCOLUMNS to create a calendar table. This week, we are going to talk about another DAX function, SELECTCOLUMNS. This function adds calculated columns to the given table or table expression. It has following syntax to operate:
SELECTCOLUMNS(table, name, scalar_expression [, name, scalar_expression]…)
where:
- table represents any DAX expression that returns a table
- name is the name given to the column, enclosed in double quotes
- expression represents any expression that returns a scalar value like a column reference, integer or string value.
This function can be used to add calculated columns in most cases and it also can be used to create a calendar table directly.
In the existing connections, we import the table in current worksheet and choose ‘Edit DAX’ option as previously discussed in blog here. The evaluation function is applied to generate the calendar table and the syntax is shown below:
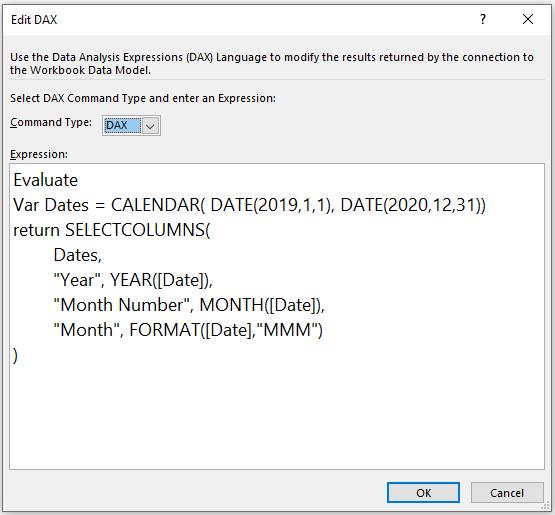
Evaluate Var Dates = CALENDAR(DATE(2019,1,1), DATE(2020,12,31)) return SELECTCOLUMNS(Dates, "Year", YEAR([Date]), "Month Number", MONTH([Date]), "Month", FORMAT([Date],"MMM"))
We first define a variable Dates which is assigned the result returned from the function CALENDAR. The CALENDAR function returns a Date table with one single column of different dates defined between two different dates. In this case, we define the starting date as 1 Jan 2019 and the ending date as 31 Dec 2020. Therefore, the CALENDAR function returns a single column table with dates between these dates. Then, we use the SELECTCOLUMNS function in the return syntax to add extra columns based upon the existing created table of Date. Each added column is based on different functions. The added columns include: Year, Month Number and Month. For the column of Year, the YEAR function returns the year for Date. For the column of Month Number, the MONTH function returns month for Date. For the column of Month, we use FORMAT function to return the text value of month for Date (Jan, Feb or March etc.).
The resulting table would be (not displayed in full):
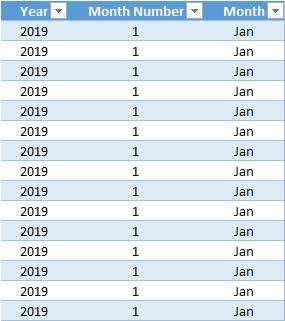
The result is slightly different from the calendar table generated by ADDCOLUMNS. The result table generated by ADDCOLUMNS keeps the column of Date created by CALENDAR function while SELECCOLUMNS only keep the added columns. If we want to keep the Date column, we should write the DAX slightly differently:
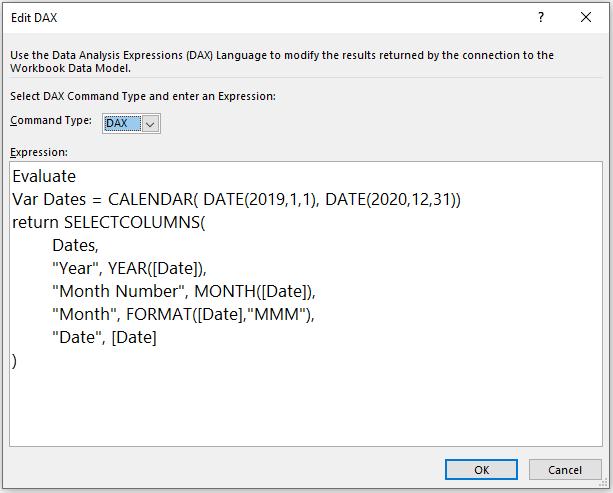
Evaluate Var Dates = CALENDAR(DATE(2019,1,1), DATE(2020,12,31)) return SELECTCOLUMNS(Dates, "Year", YEAR([Date]), "Month Number", MONTH([Date]), "Month", FORMAT([Date],"MMM"), "Date", [Date])
The result would then be:

With this method, we can keep the Date column.
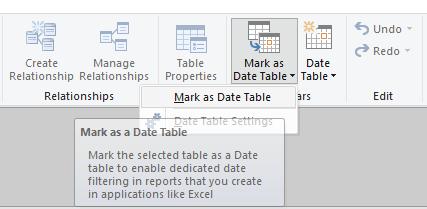
Next, we can define the name of this table and import to Power Pivot interface by click tab ‘Add to Data Model’. In the interface, we simply choose the calendar table imported and mark it as a Date Table.
That’s it for this week!
Stay tuned for our next post on Power Pivot in the Blog section. In the meantime, please remember we have training in Power Pivot which you can find out more about here. If you wish to catch up on past articles in the meantime, you can find all of our Past Power Pivot blogs here.