Power Query: Setting a Better Example
14 February 2018
Welcome to our Power Query blog. This week, I take a look at the latest improvements to the ‘Add Column from Examples’ functionality.
January brought some new updates for Get & Transform in Excel 2016 / the Power Query add-in in Excel 2013 and 2010. Details on how to make sure the latest features are available are in Power Query – Installing and Updating.
Microsoft summarises the update as “…adding support for generating ‘Conditional Columns’ as a part of the ‘Add Column From Examples’ feature…”. I described the ‘Add Column From Examples’ feature and how to use it in Power Query: Setting an Example.
The new functionality included in the latest update is split into four areas:
- Basic Conditional Column’
- ‘Conditional Column Ranges’
- ‘Bucketing’
- ‘Null Fallback’.
In order to understand what I can do as a result of the update, I start with an existing query of mine, and look at each area in turn. If you wish to work along you can download the example file here.
1. Basic Conditional Column
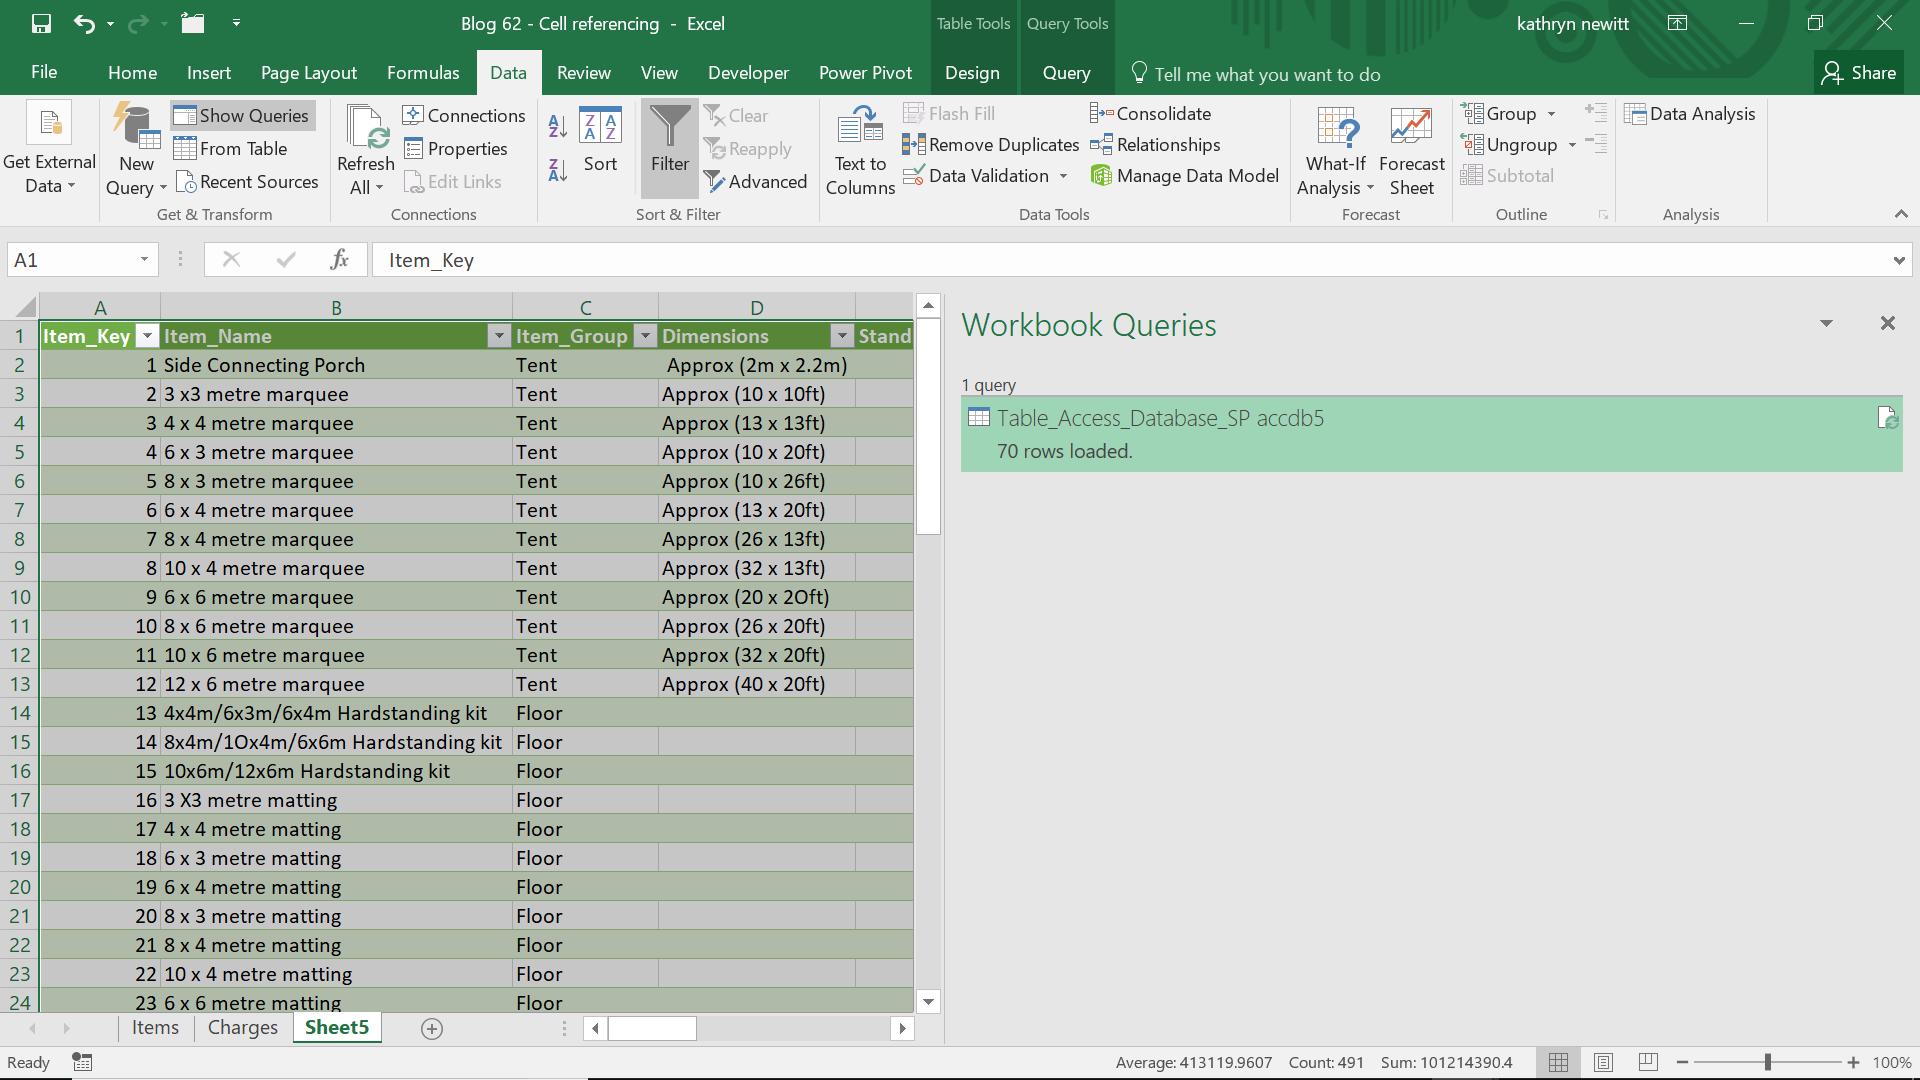
On the ‘Get and Transform’ section of the ‘Data’ tab, I make sure I have selected ‘Show Queries’ and then I double-click on the query available.
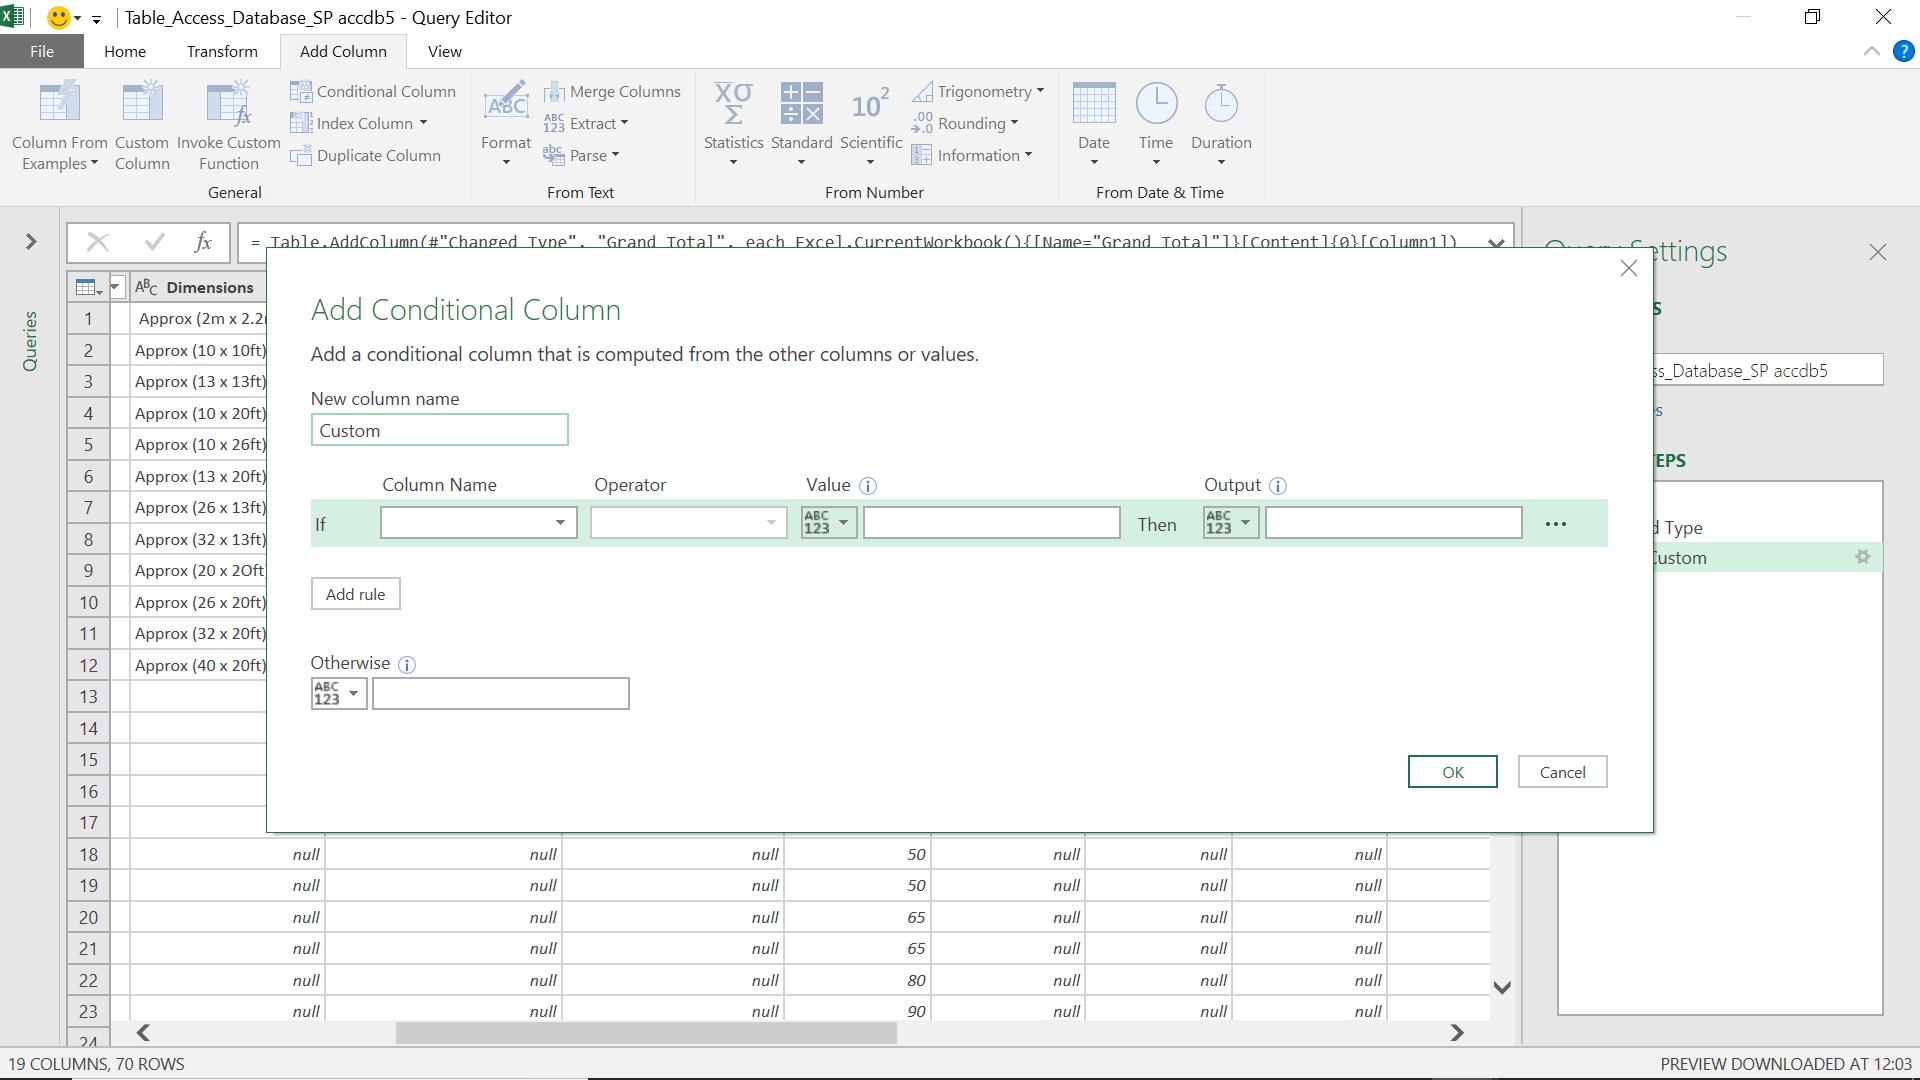
Since the update will allow conditional column features to be incorporated into the ‘Add Column From Examples’ feature, I start by revisiting what can be achieved using a conditional column. On the ‘Add Column’ tab, I choose the ‘Conditional Column’ section ready to set up my new transformation rules. I describe how to use conditional columns in Power Query: In Terms of Conditional Columns.
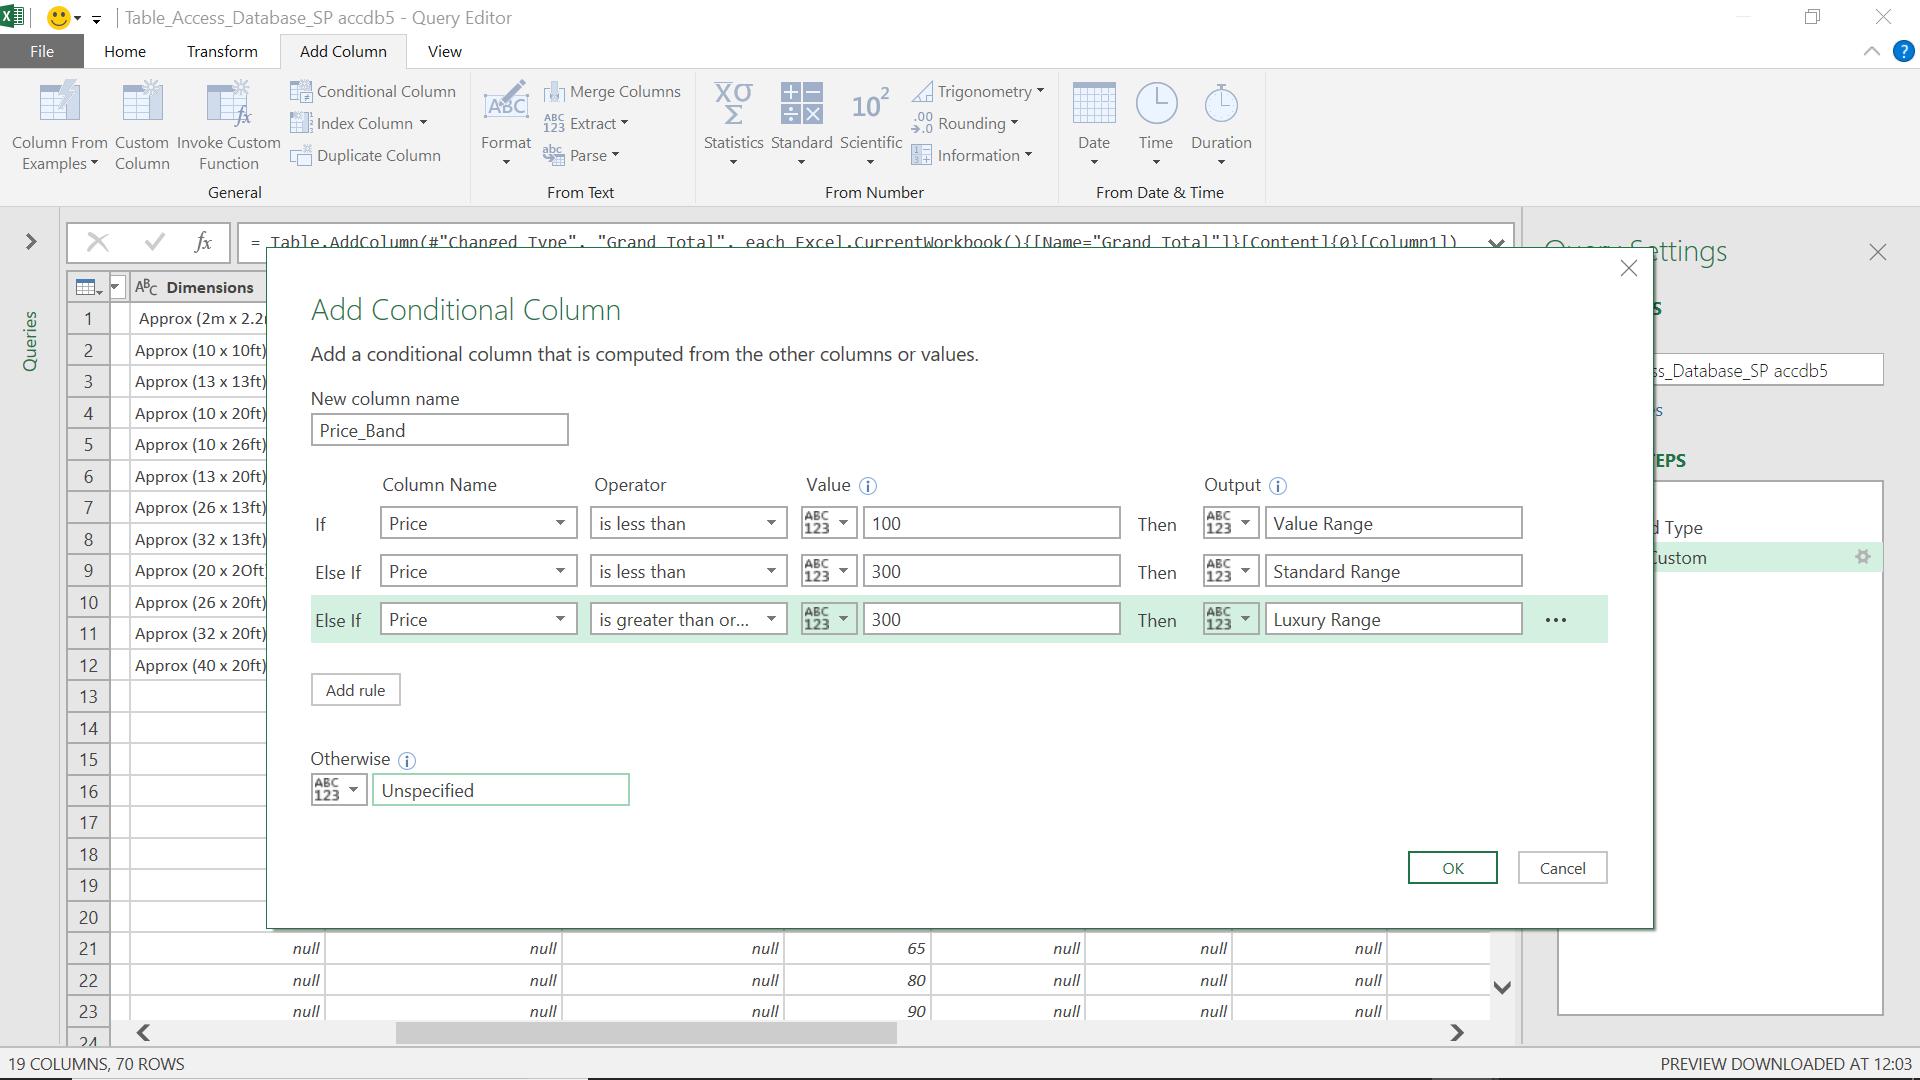
Thus, I have my new conditional column Price_Band. Now I can show how similar logic can used in ‘Column from Examples’:
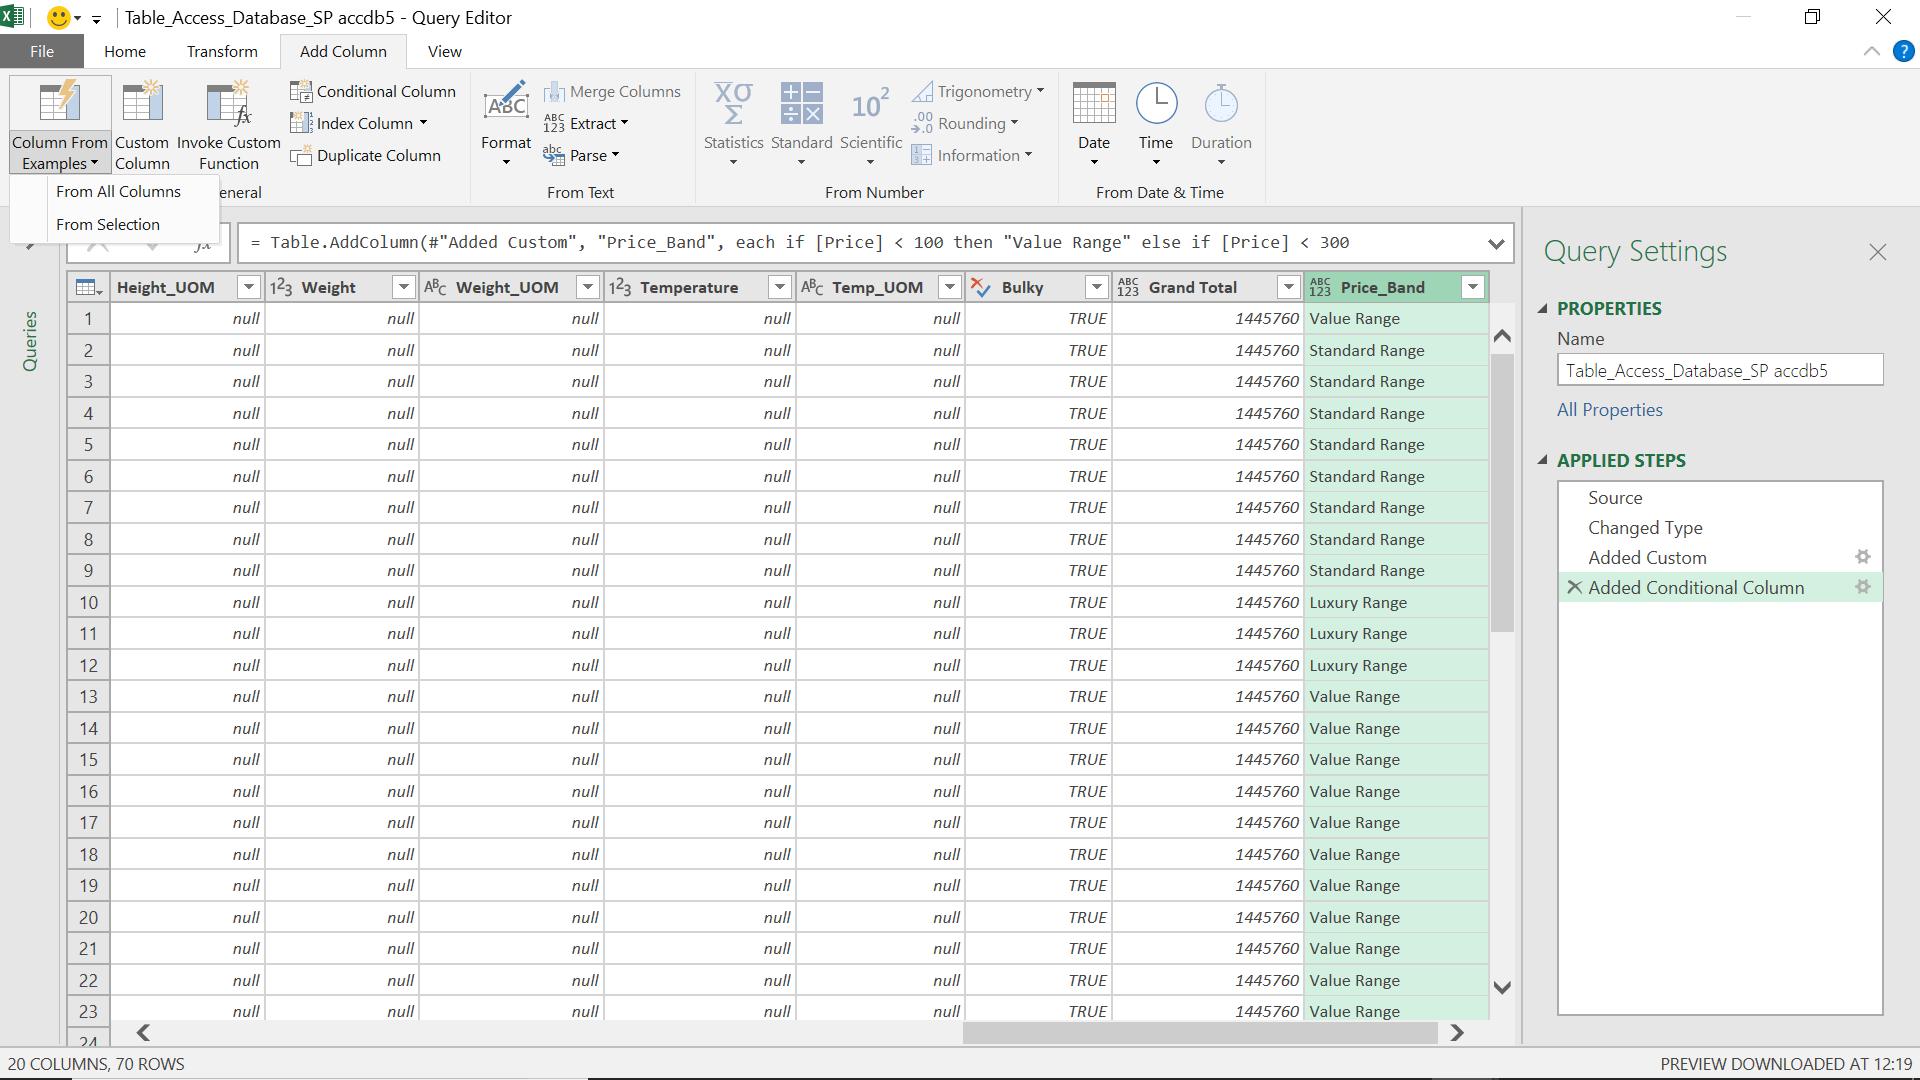
I choose ‘Column From Examples’ from the ‘Add Column’ tab. I opt to only allow my examples to come from my new column Price_Band:
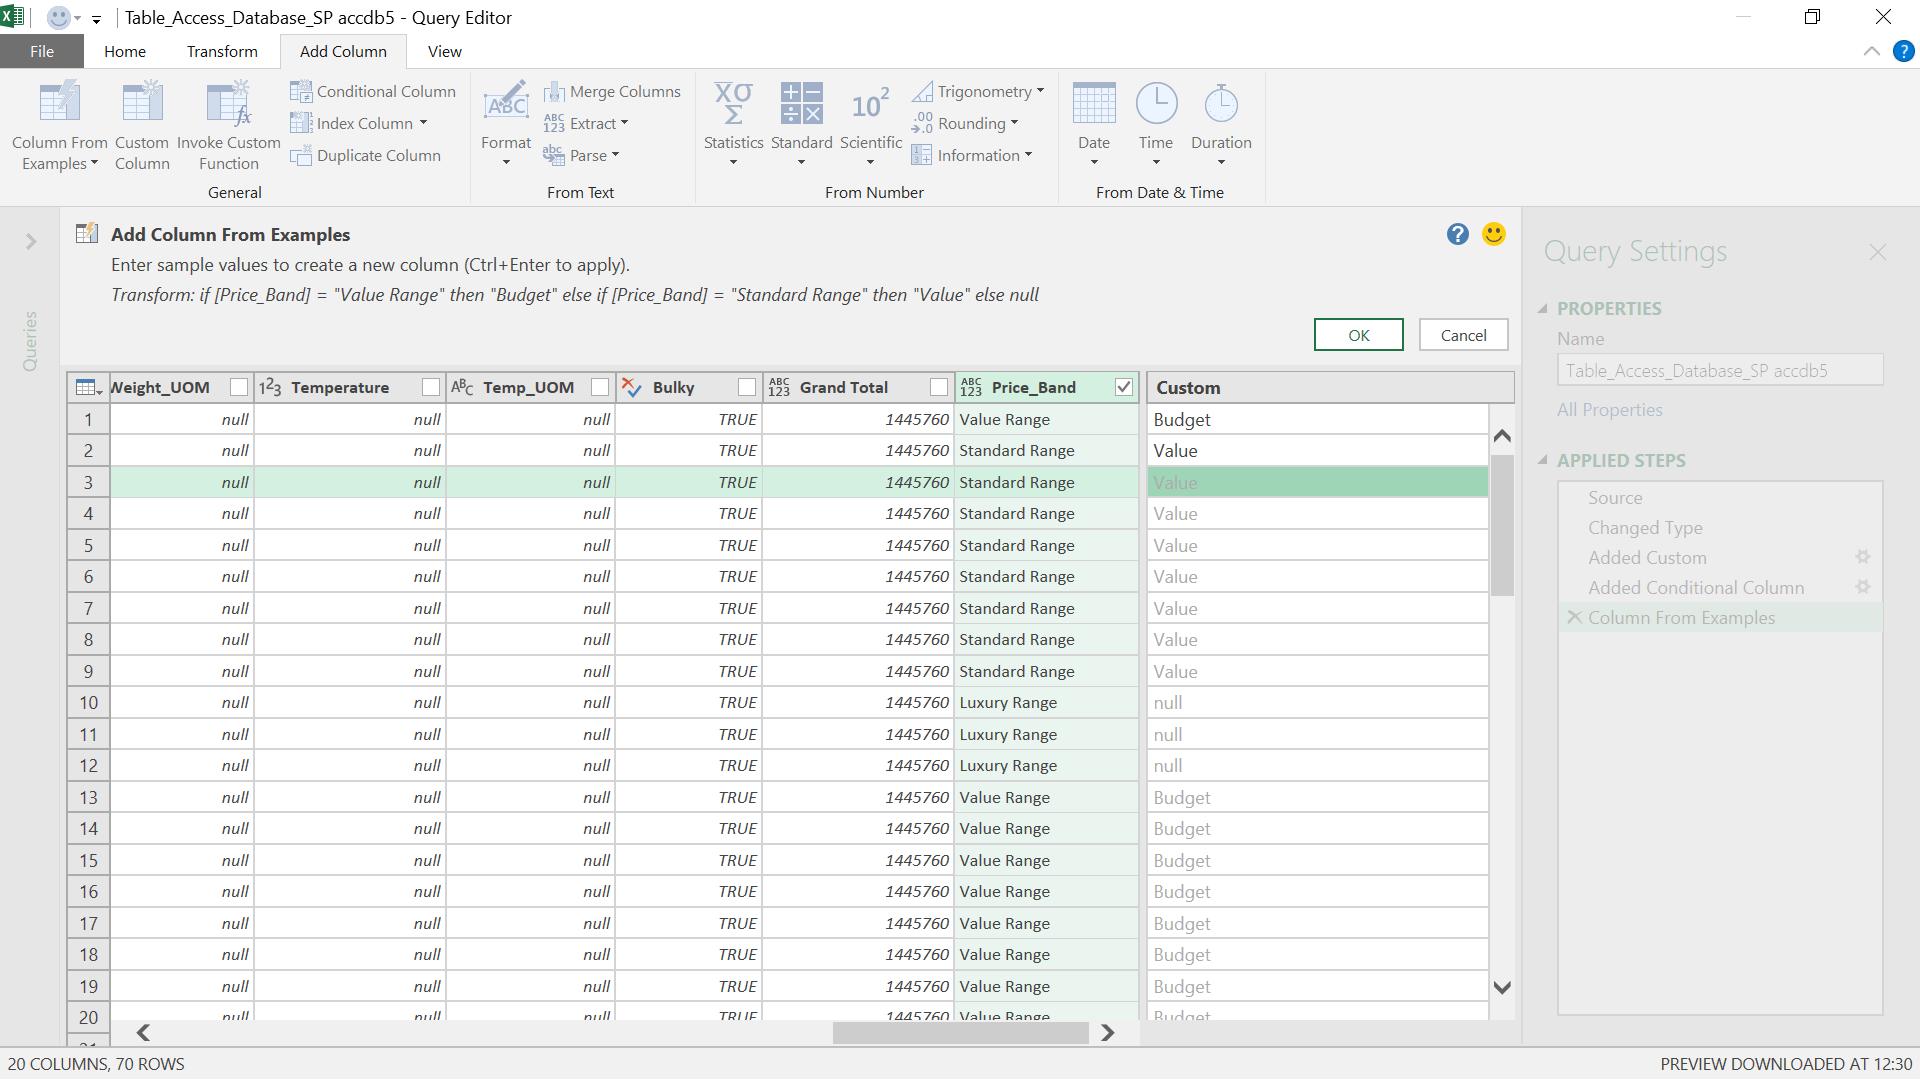
Power Query has nothing to go on for the first entry, but as soon as I enter a second value, then a transformation is attempted:
Transform: if [Price_Band] = ‘Value Range’ then ‘Budget’
else if [Price_Band] = ‘Standard then ‘Value’
else null
I only have three bands on my example, so I need to tell Power Query how to transform ‘Luxury Range’:
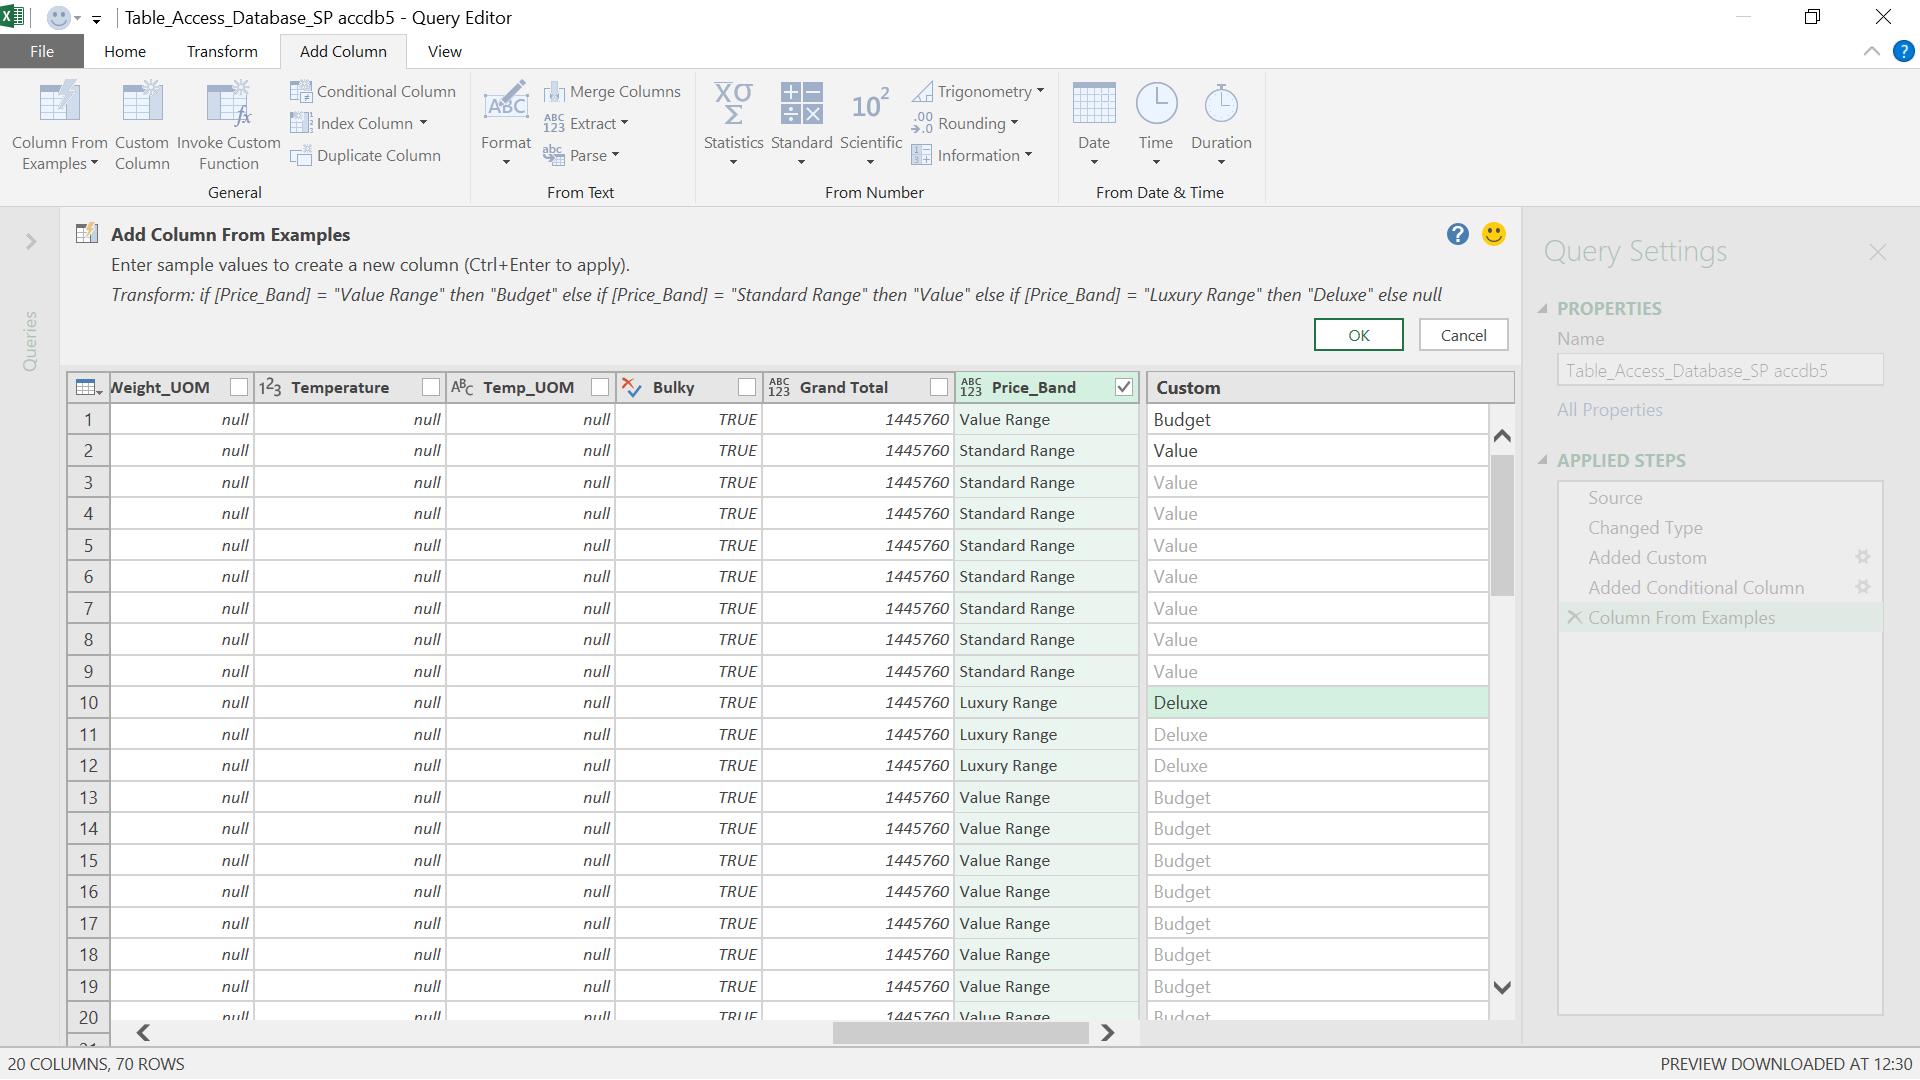
The last line is added to the formula so that all conditions are catered for:
Transform: if [Price_Band] = ‘Value Range’ then ‘Budget’
else if [Price_Band] = ‘Standard then ‘Value’
else if [Price_Band] = ‘Luxury Range’ then ‘Deluxe’
else null
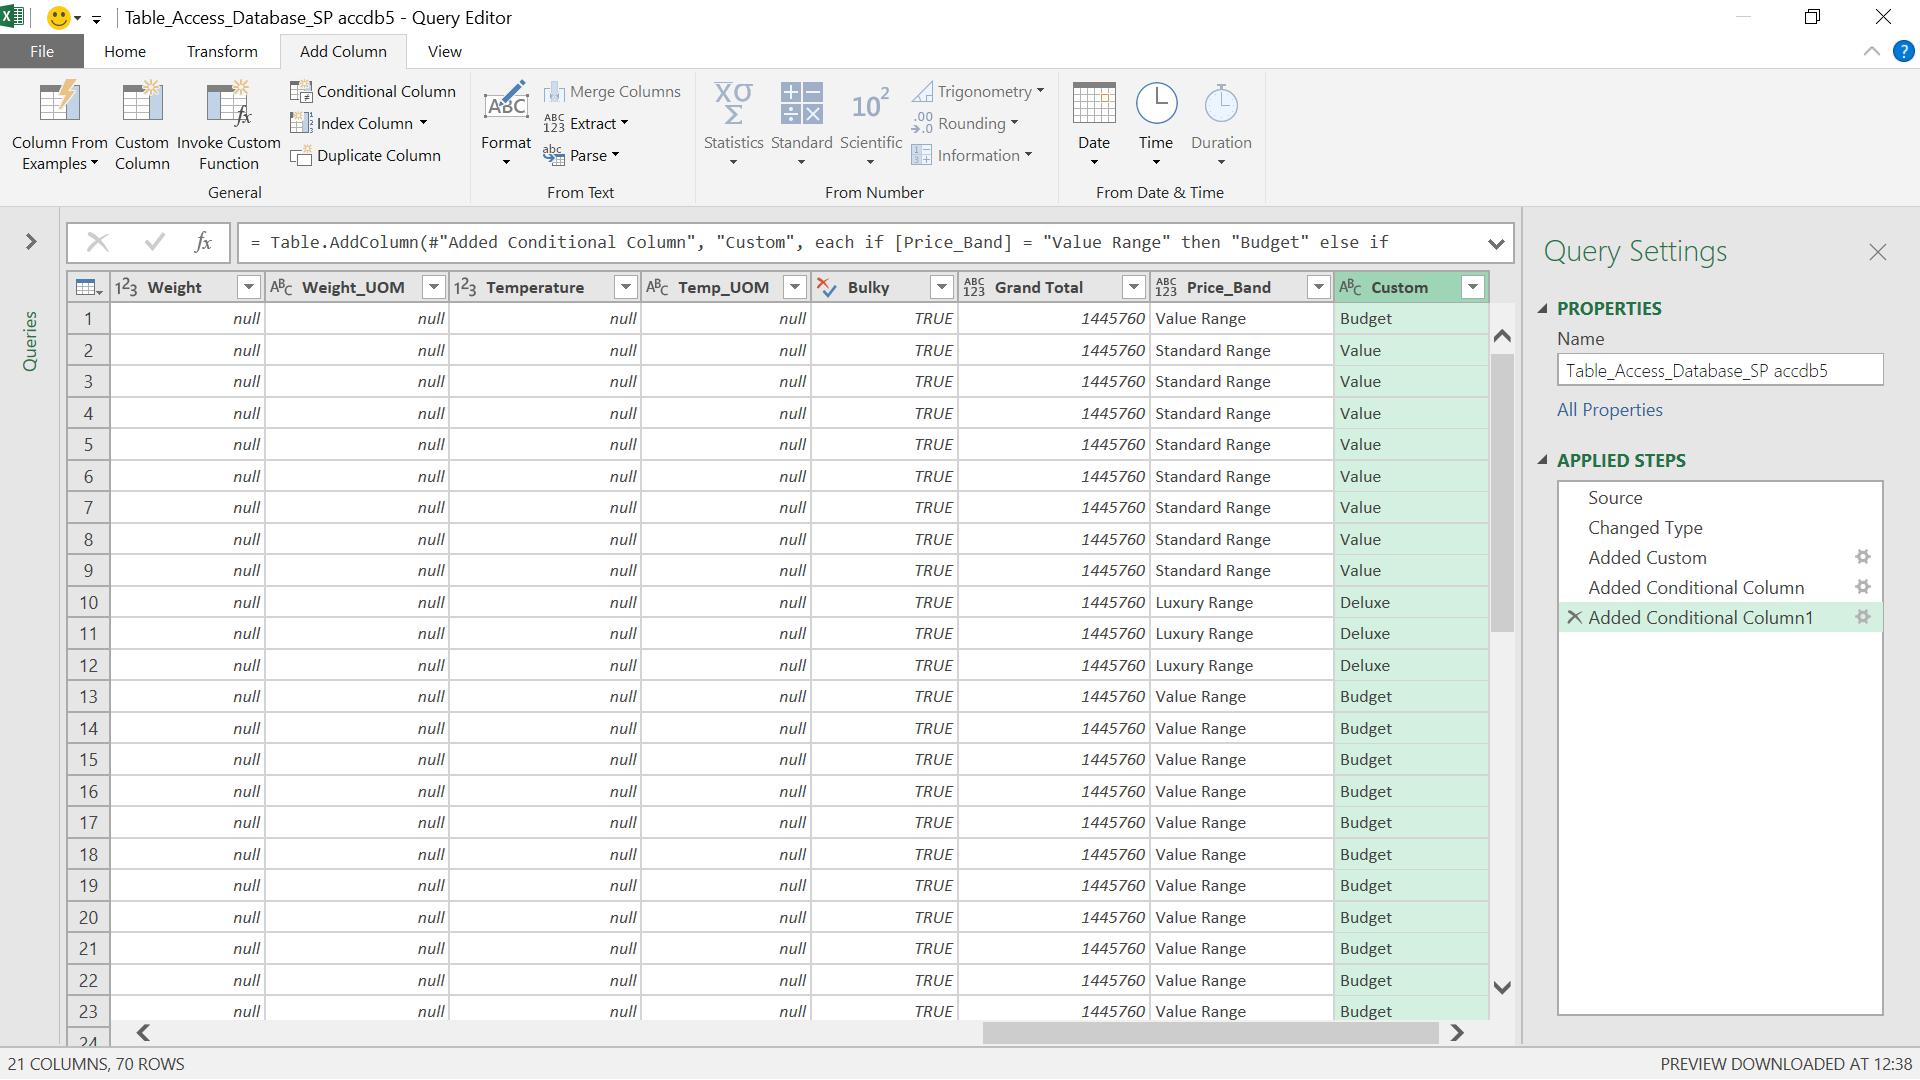
When I click ‘OK’, my new column is added.
2. Conditional Column Ranges
I could also create my new ‘Column From Examples’ directly from the Price column instead.
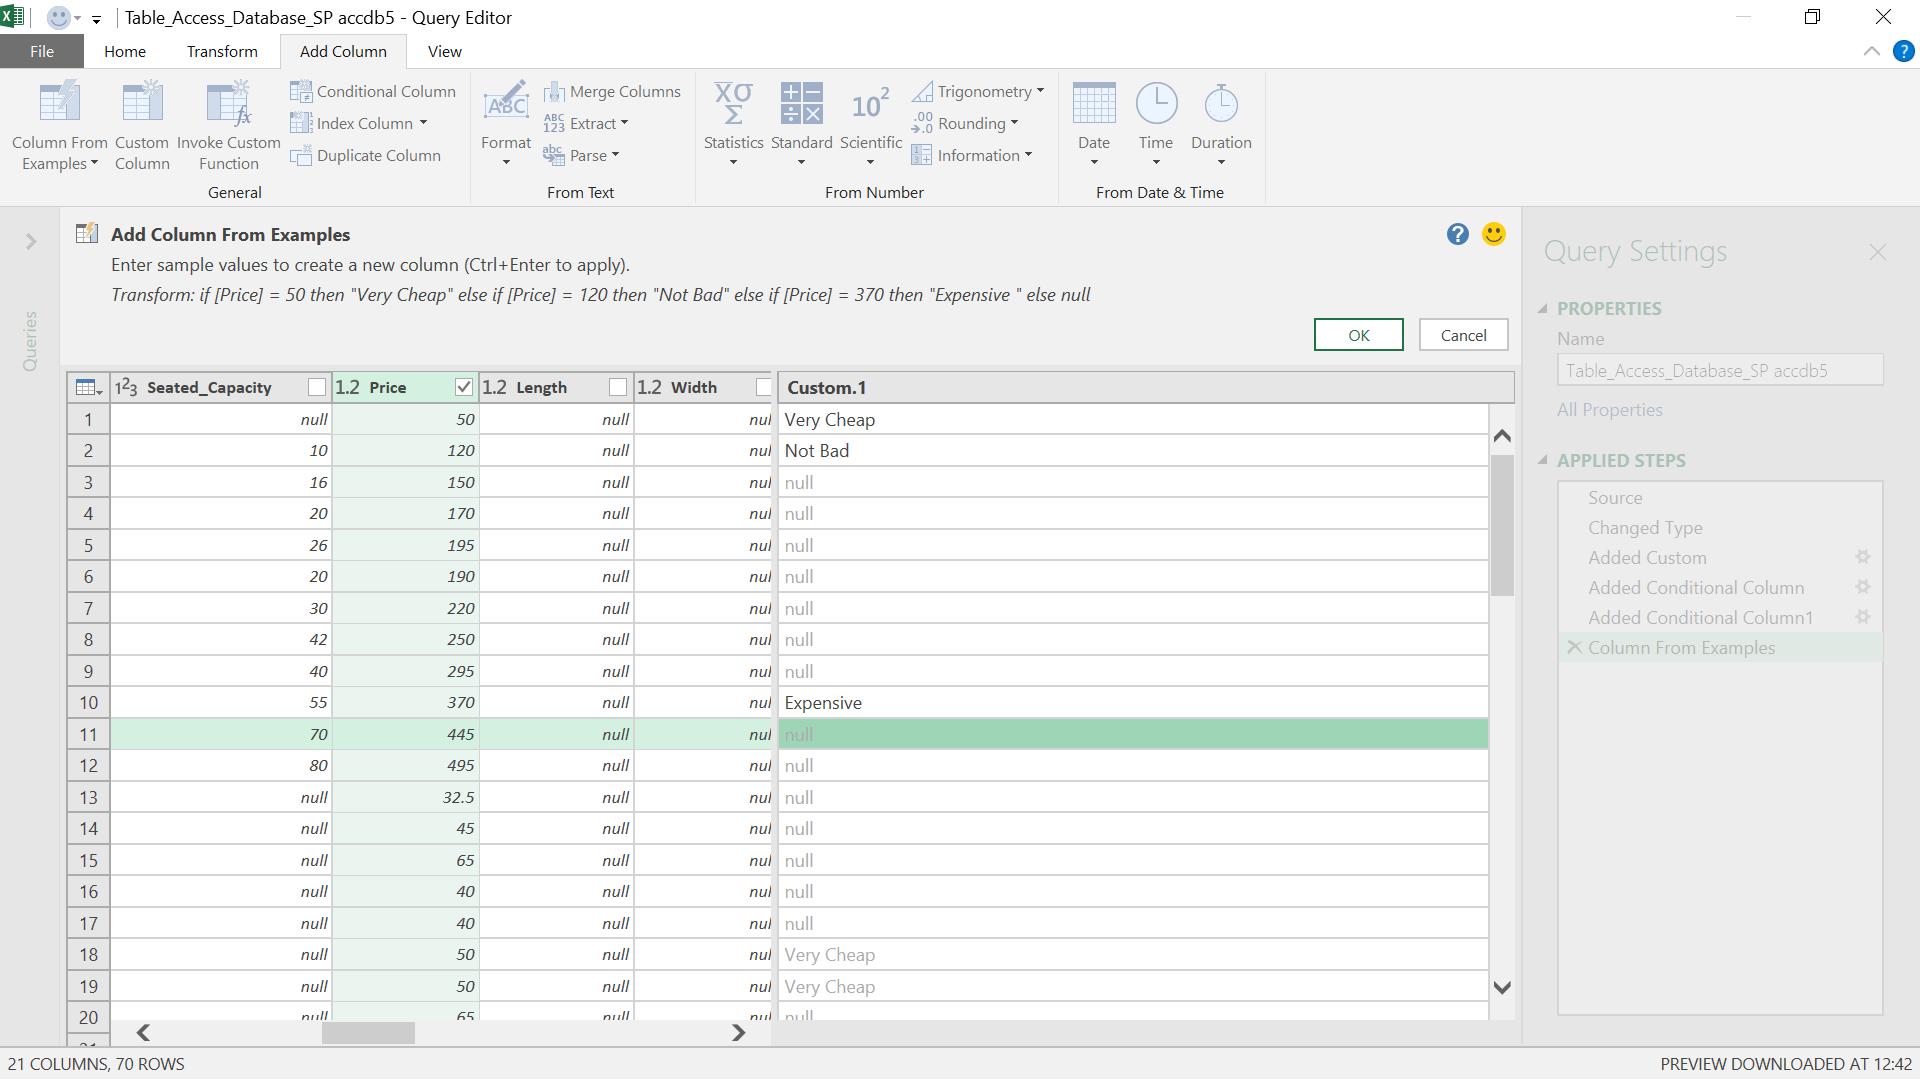
For the first few examples, the basic transformation is attempted again with a direct translation from each price value to the description. I want a range, so I have to give Power Query more examples:
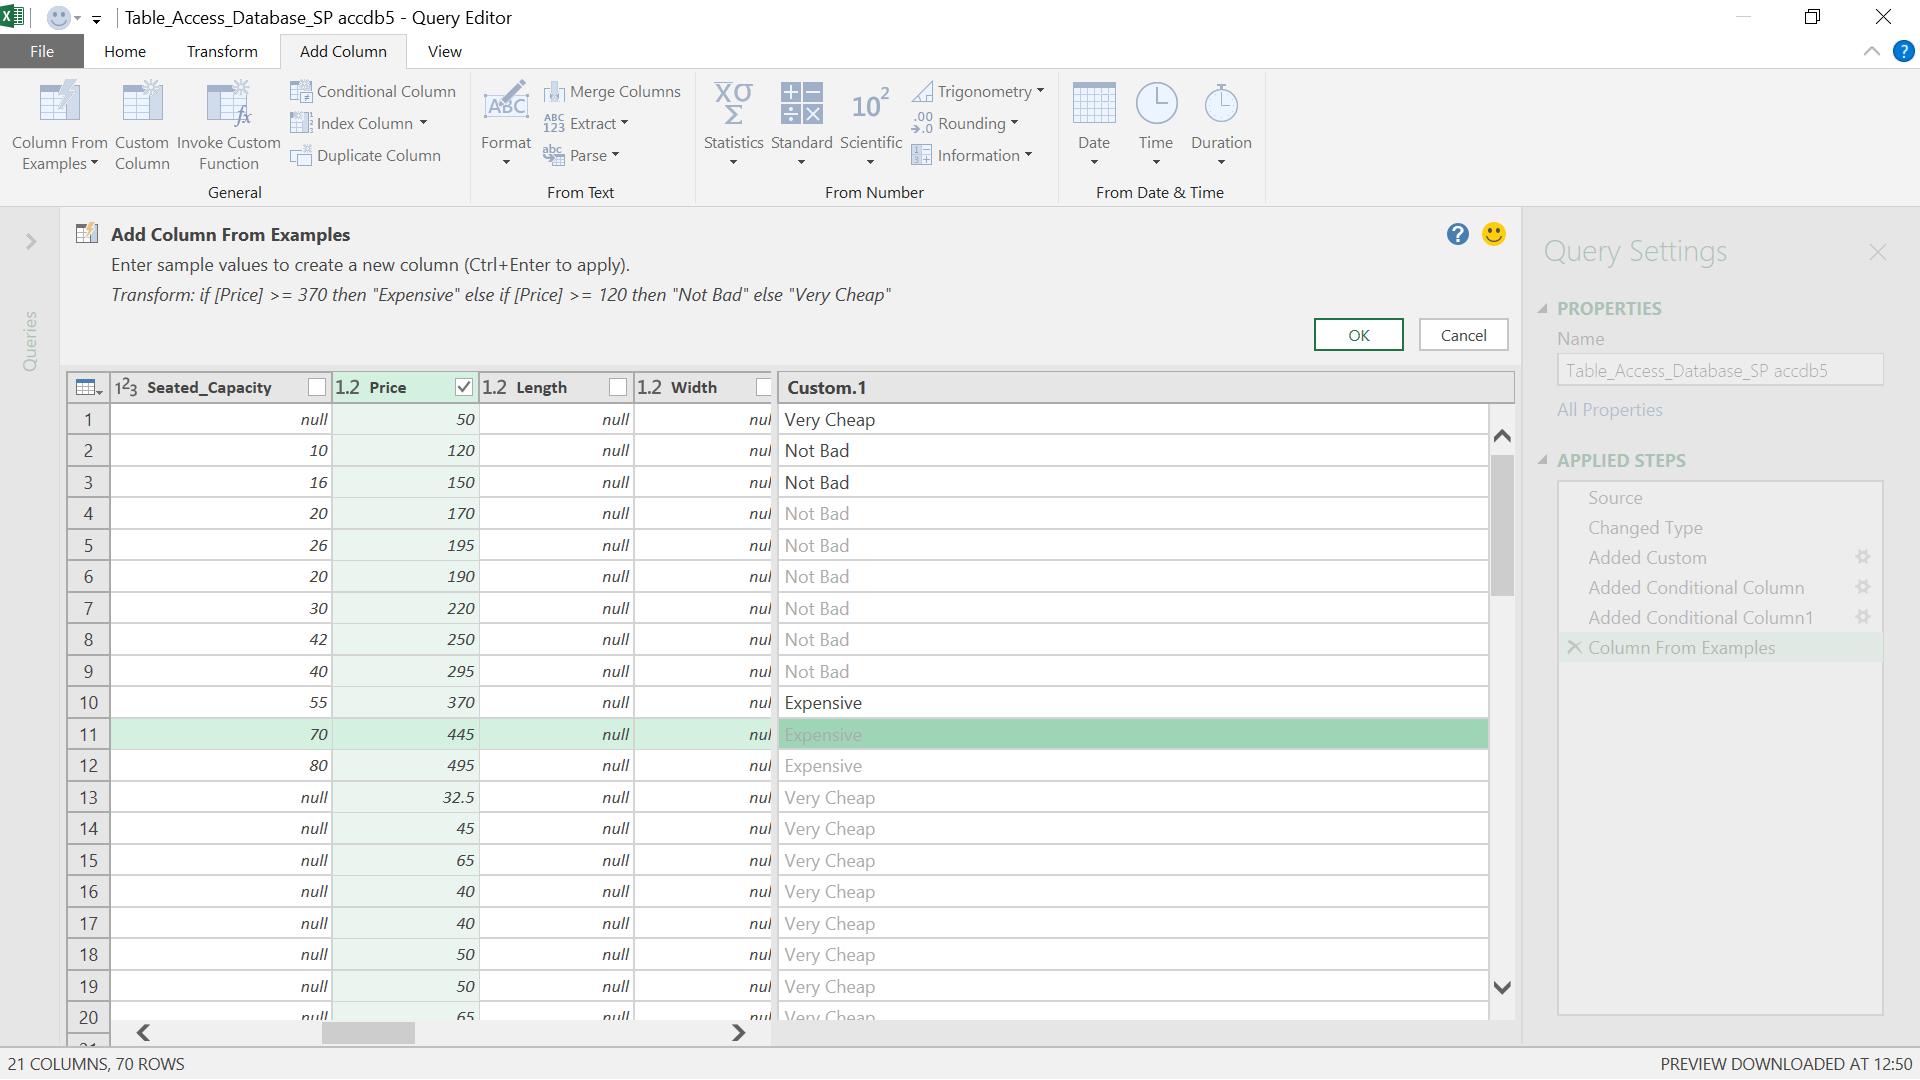
Since I didn’t have examples right on my boundaries, Power Query has come up with the most accurate version based on my examples:
Transform: if [Price] >=370 then ‘Expensive’
else if [Price] >=120 then ‘Not Bad’
else ‘Very Cheap’
3. Bucketing
I could also put each of my prices into a bucket! This could be a step towards creating descriptions for the ranges I want to specify, even if I don’t have examples on the border of those ranges. These buckets have to be the same size though, so each range is the same size too. I choose to create a ‘Column from Examples’ based on just my Price column again.
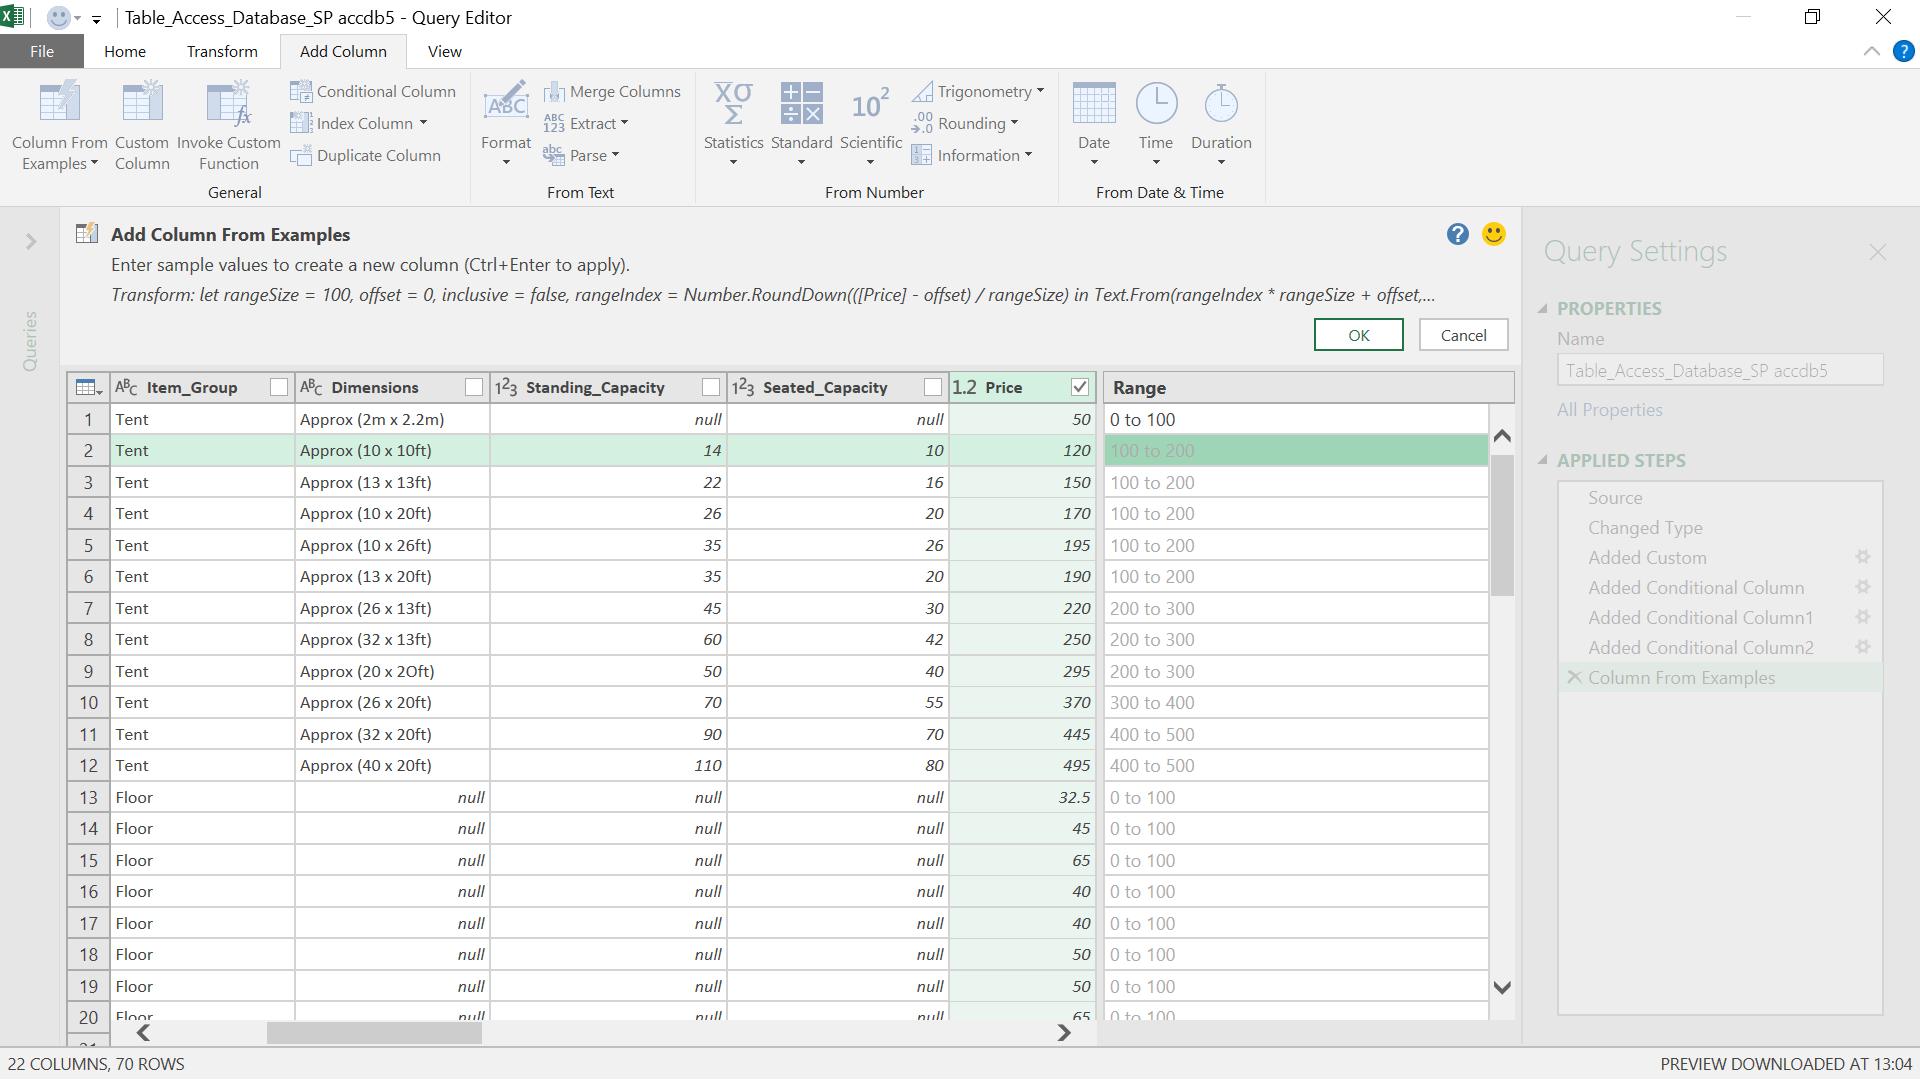
As soon as I enter a range or bucket to put the first example into, all the other data is put into a bucket too. Therefore, all of my prices are in a bucket with a range of 100. It is slightly annoying that the transformation hasn’t wrapped so that I can see it, so I create the column to see the M language behind it!
Transform: let rangeSize = 100, offset = 0, inclusive = false,
rangeIndex = Number.RoundDown(([Price] - offset) / rangeSize)
in Text.From(rangeIndex * rangeSize + offset, "en-GB")
& " to "
& Text.From((rangeIndex + 1) * rangeSize
+ offset - (if inclusive then 1 else 0), "en-GB"), type text)
4. Null Fallback
What should my transformation do if no price is entered for one of my items? No price at all in my tent scenario probably doesn’t equate to ‘Very Cheap’, it is more likely to be a ‘Free add-on’. Therefore, I am going to make a zero price equate to a null description and then specify what to do with a null description. (Yes, there are other ways to deal with a zero price, but the point here is to show how nulls in text columns can be handled!) I have configured my Price_Band column to be null if the price is zero in the screen below:
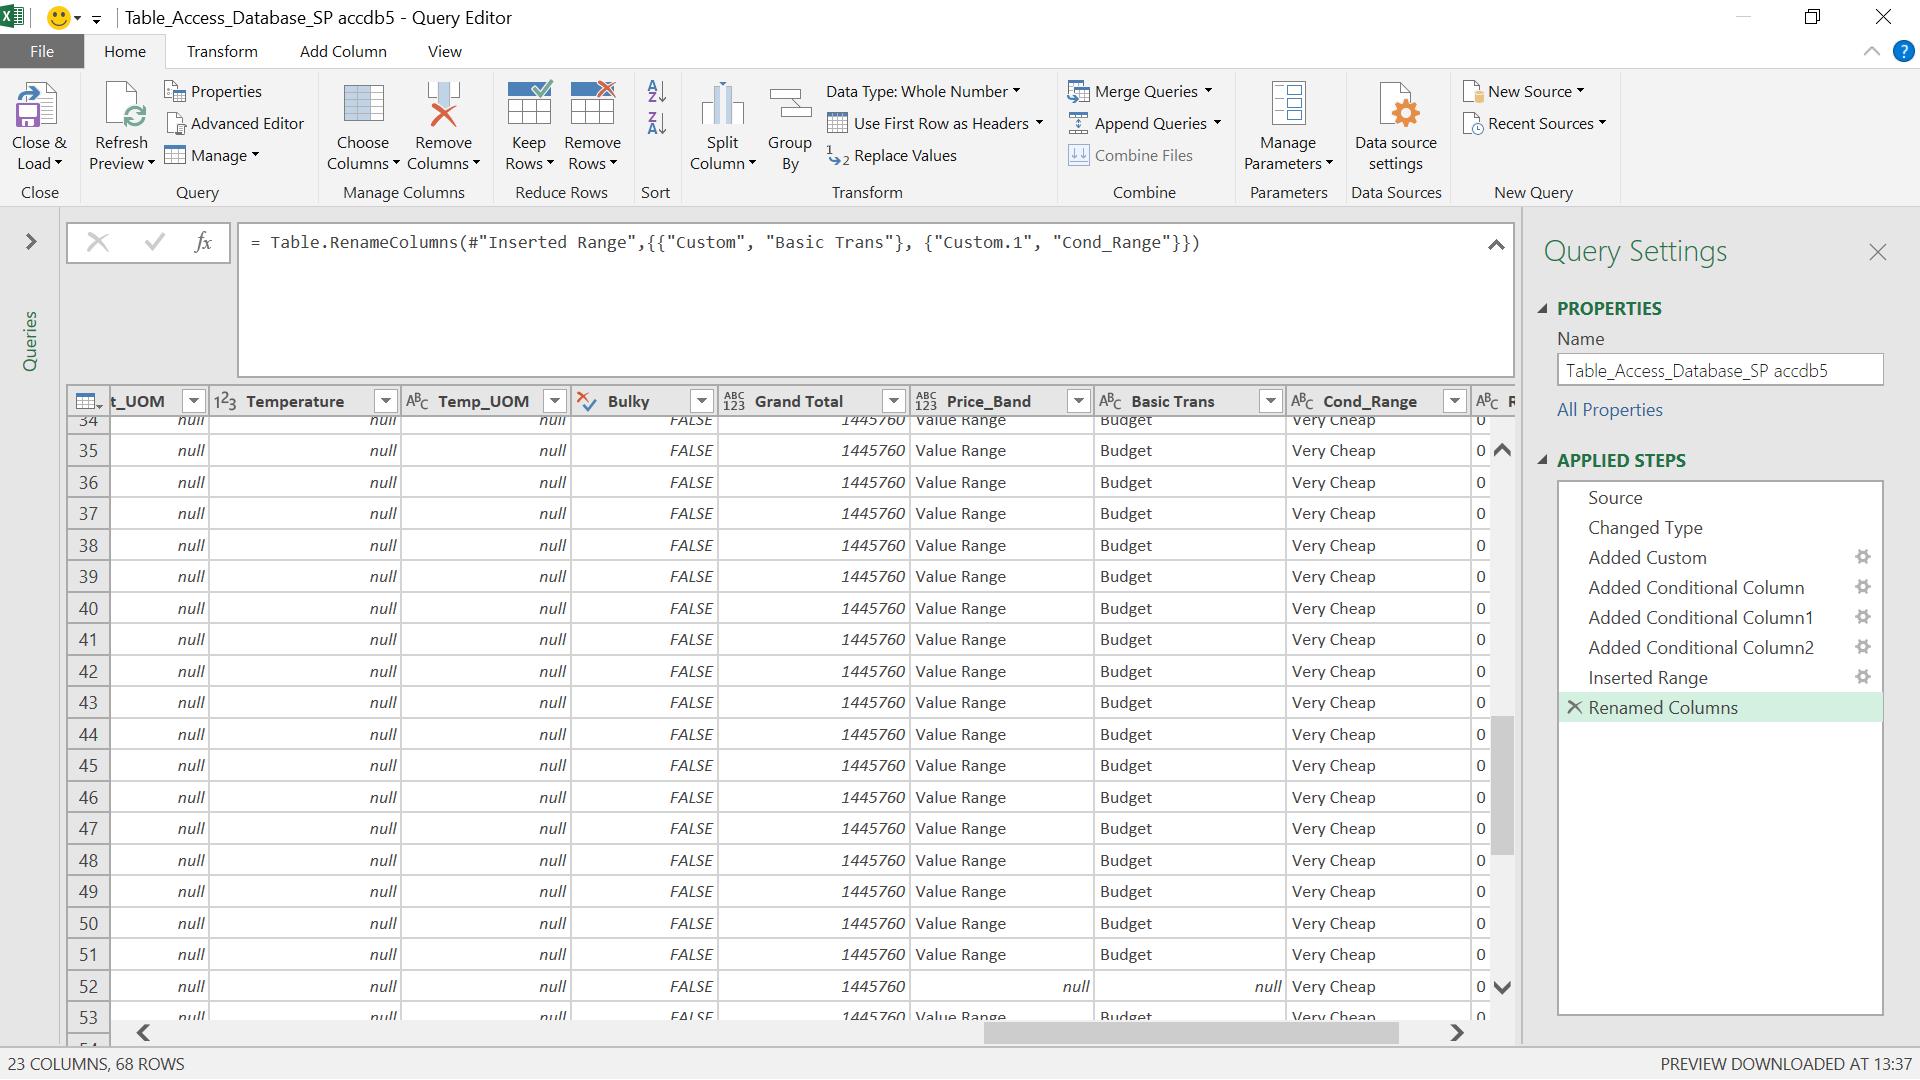
I will specify what to do with the null values in my ‘Add Column from Examples’ based on examples using my Price_Band column.
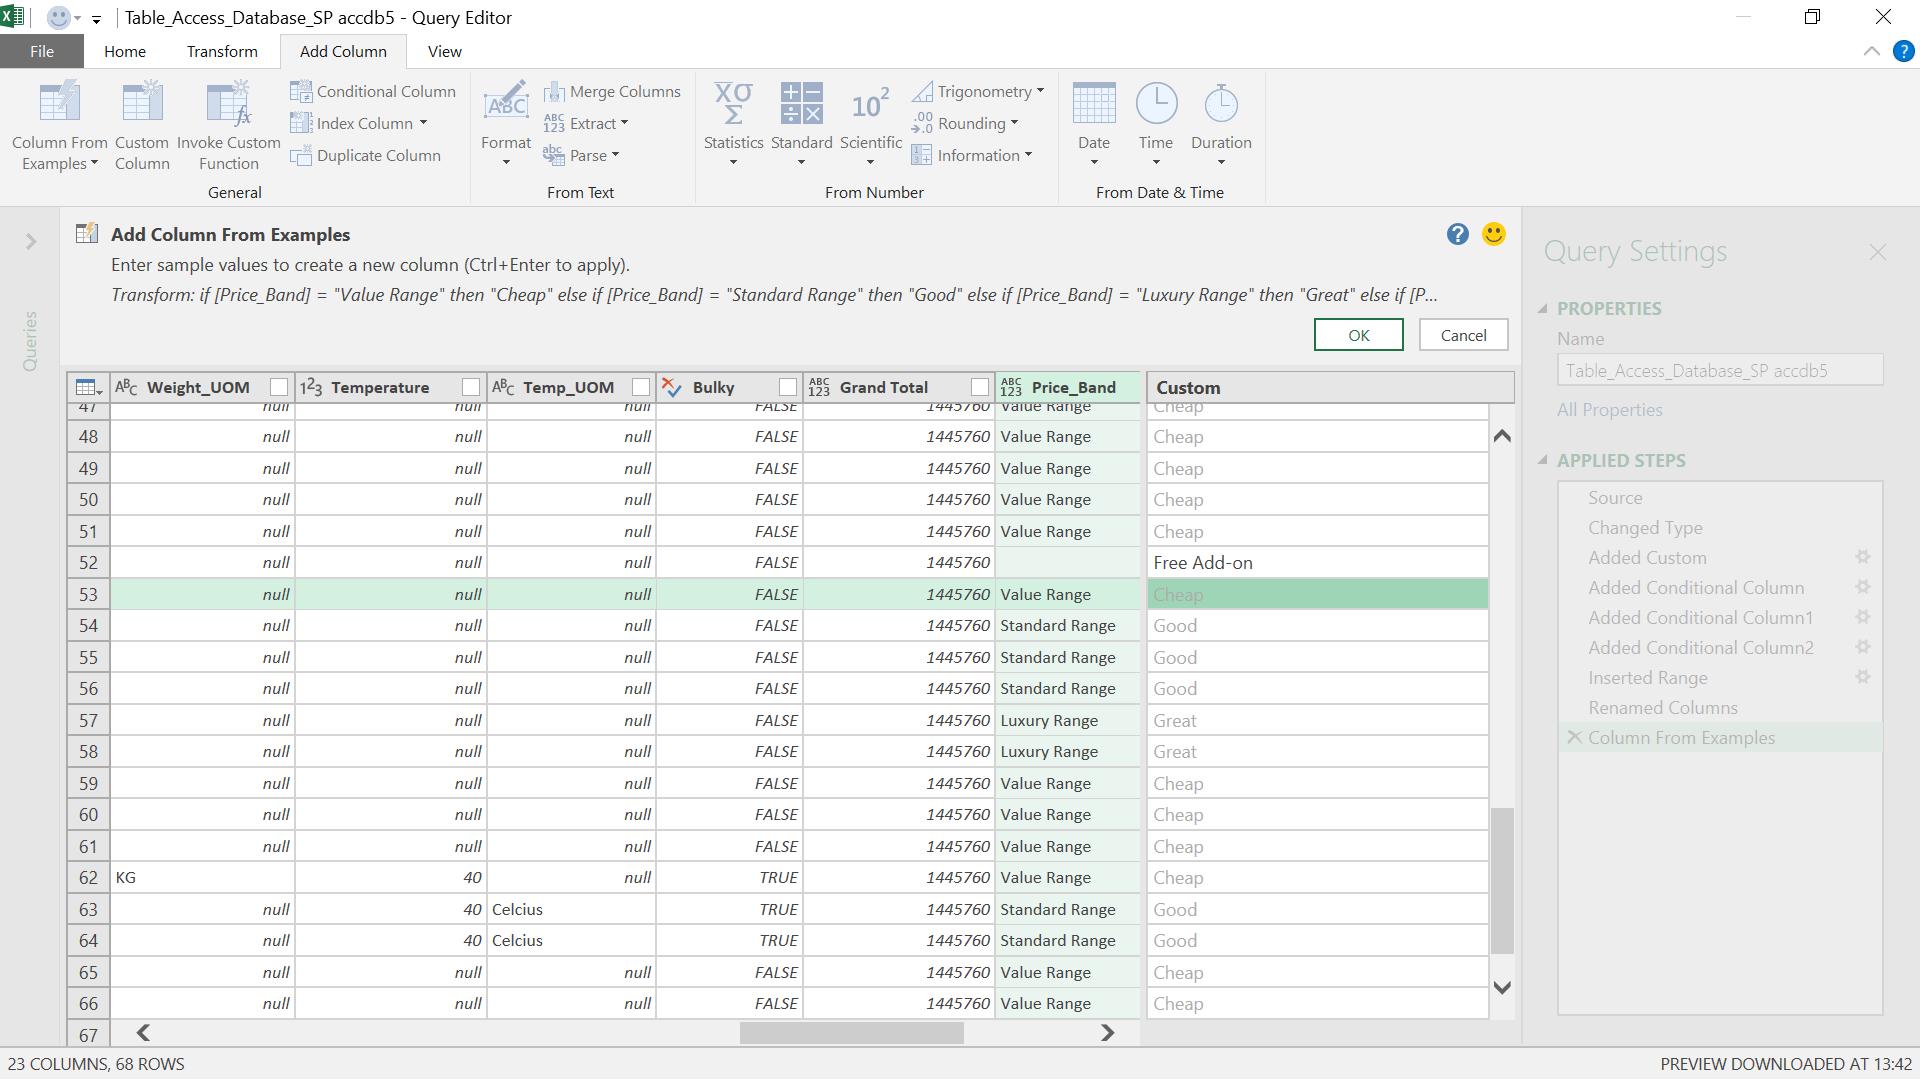
Again, in order to see the M language behind this step, I need to create the column.
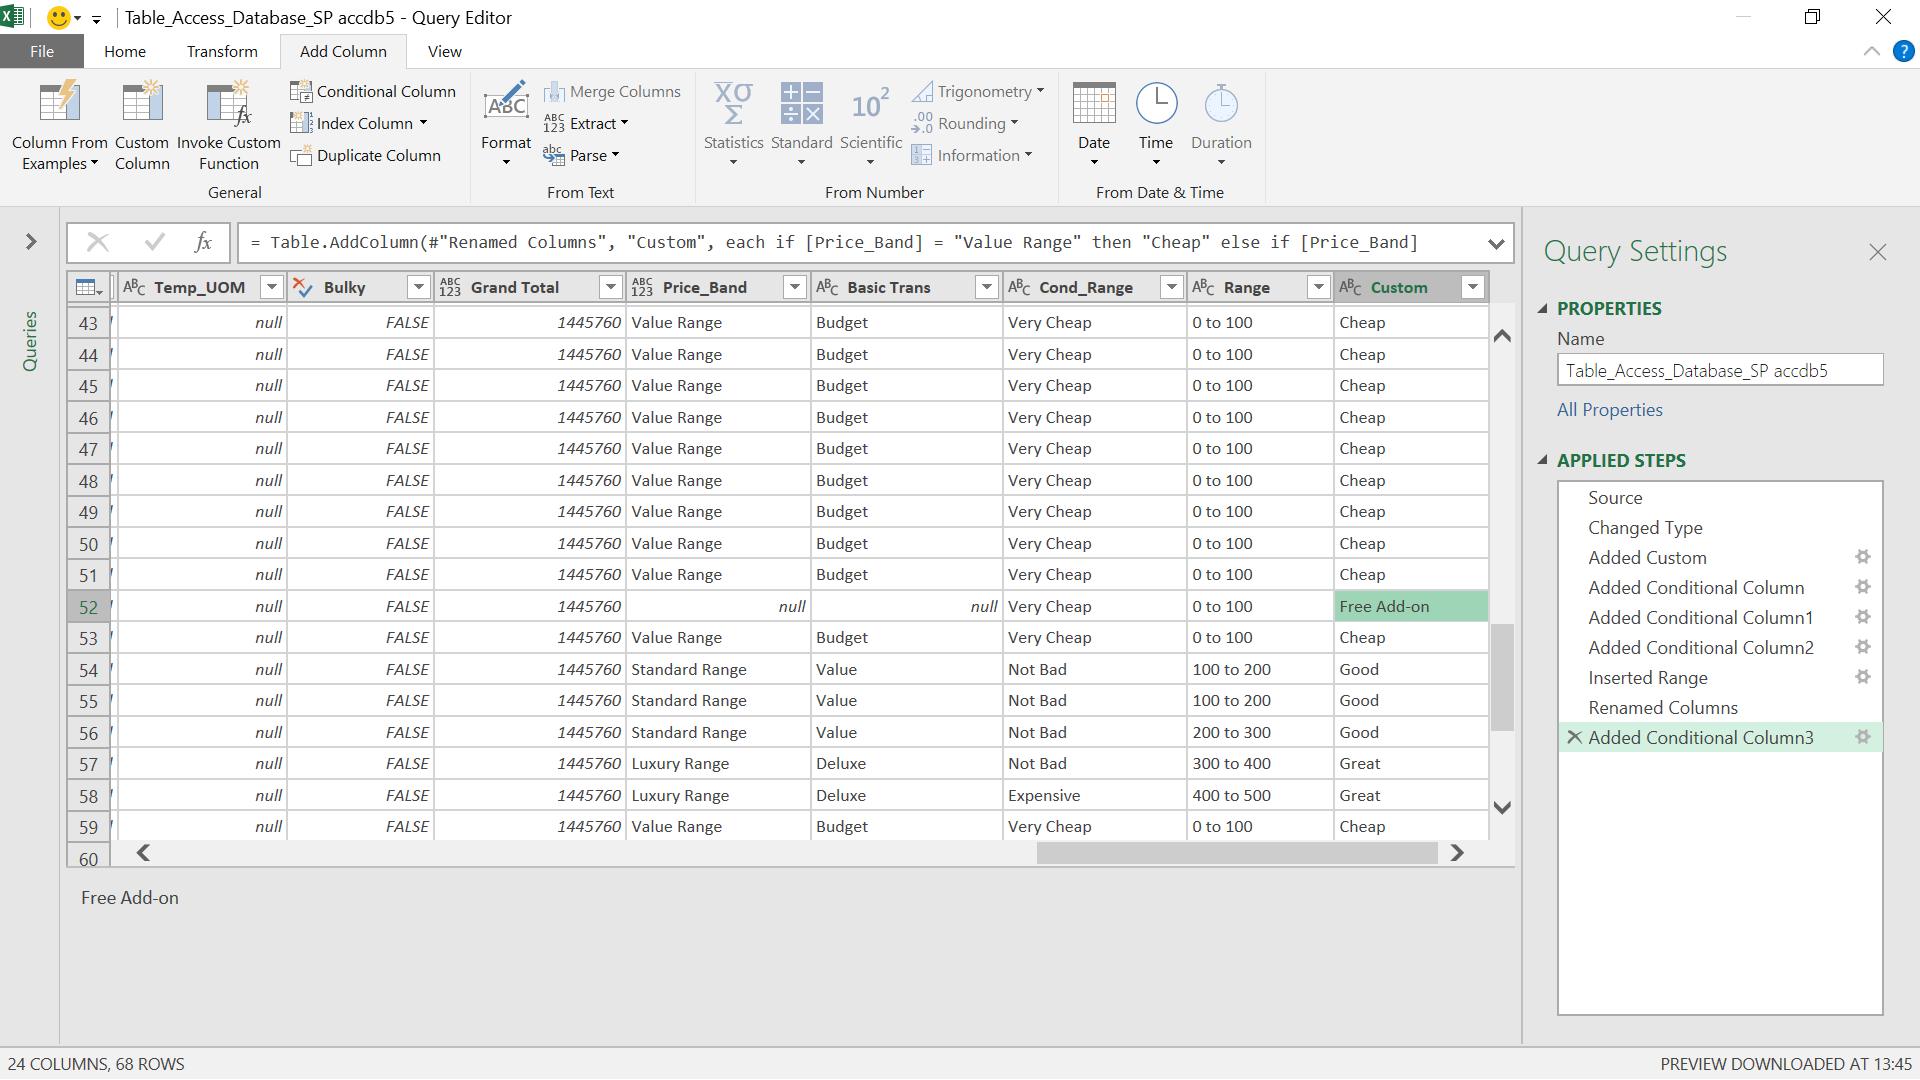
The formula has been generated correctly, and my ‘Free Add-on’ appears next to the null Price_Band
= Table.AddColumn(#"Renamed Columns", "Custom", each
if [Price_Band] = "Value Range" then "Cheap"
else if [Price_Band] = "Standard Range" then "Good"
else if [Price_Band] = "Luxury Range" then "Great"
else if [Price_Band] = null then "Free Add-on" else null, type text)
Want to read more about Power Query? A complete list of all our Power Query blogs can be found here. Come back next time for more ways to use Power Query!

