
VBA Blogs: Hidden vs Very Hidden
23 June 2017
We haven’t seen the VBA blog in a little while. So let’s take a look at things we can’t see. If something is hidden, it’s hard to see. Therefore, if something is very hidden, it must be very hard to see, right?
That’s the overall principle behind hiding sheets using VBA. Let’s go over the basics. In normal Excel, a sheet is either Visible or it’s Hidden. If you can see it at the bottom of the page, it’s Visible, and you can right click on the sheet name, click Hide, and this will classify the sheet as a Hidden sheet. If you want, you can then unhide the sheet by right clicking on any sheet, click on Unhide, and this will pull up a list of the Hidden sheets and you can choose which sheet to make Visible again.
(Interesting note – you can hide multiple sheets at a time, but you need to unhide the sheets one at a time. Excel developers take note – maybe the user experience would be improved by being able to Ctrl-click multiple sheets at once?)
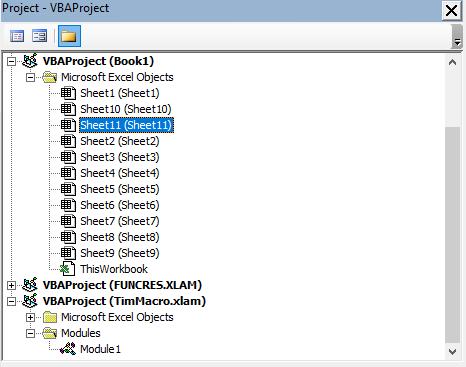
So if I ask you, how many sheets are there in the file in this screenshot below, you’ll be forgiven for saying that there are 4 sheets – 3 that are Visible, and one that is Hidden.

However, there’s a third state of sheets that’s not actually accessible via the standard Excel UI. This state is known as Very Hidden. When a sheet is Very Hidden, not only is it not visible in your list of sheets, it’s also not shown in the list of sheets when you click on “Unhide”. Very hidden indeed!
The only way to access a Very Hidden sheet is to go into the VBA Editor (Alt + F11). On the top left hand side of the screen, you’ll see the Project Explorer. In here, you’ll see different files and add-ins that you have open, along with the relevant objects that they’re made up of. Here you’ll see the answer to my earlier question – this file has 11 sheets! Click on one of the sheets in any file you have open.
Just below the Project Explorer, you’ll see the Properties window. This contains a number of key settings about the sheet, including the name, whether page breaks are visible, if calculations are on, and so on. The property we’re most concerned about in this instance is the very bottom one – the Visible property.
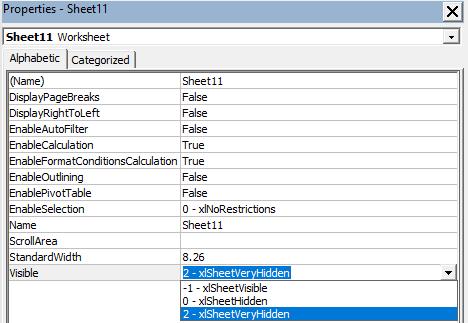
You can see in the screenshot that my sheet is currently selected to xlSheetVisible – the technical name for the Visible state. You’ll see that there are two others though – xlSheetHidden and xlSheetVeryHidden. These are the two states that I described earlier – either Hidden and can be unhidden using the UI, or Very Hidden and only accessible via VBA. You can change the state of the sheet here in the Properties window, and that will immediately hide the sheet accordingly in Excel.
So if you ever want to hide a sheet in a slightly more secure way (people can always come into the VBA editor and check for themselves), then the Very Hidden sheet state is what you’re looking for. If we want to actually code this up, we’d use the following:
Sheets(“Sheet1”).Visible = xlSheetVisible
Sheets(“Sheet2”).Visible = xlSheetHidden
Sheets(“Sheet3”).Visible = xlSheetVeryHidden
If you couldn’t guess, this will set Sheet1 to be Visible, Sheet2 to be Hidden (and able to be unhidden using the UI), and Sheet3 to be Very Hidden, requiring users to get to it via VBA.
See you for the next VBA blog in a fortnight, because next week is the June 2017 Final Friday Fix!