
VBA Blogs: Group Specific Rows
2 August 2019
Welcome back to the VBA blog! This week we are going to learn how to group specific rows by using VBA.
This week, we are going to create VBA script to group rows based on specific interval. It is very useful when end users want to keep specific rows visible and hide the other rows at certain interval.
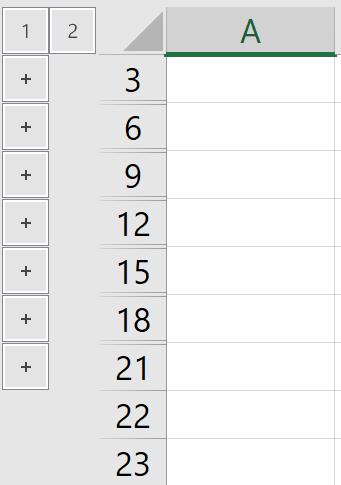
Essentially, we want to group every 2 rows from row 1 to row 21 and the result would look like this:
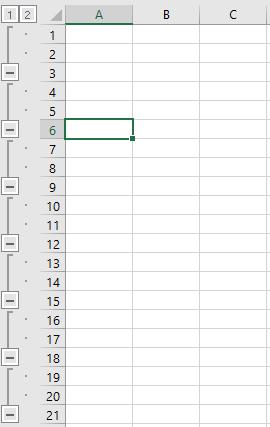
And if we expand the collapsed rows, the result would look like this:
The first step involves declaring a variable i as integer.
Dim i as integer
Then, we use for loop to look through the number from 1 to number 21 with step 3. Step 3 would tell the code to increment the variable i value by 3 every time the loop runs. So the value of i would start from 1 and then becomes 4, 7 and 11 as the looping occurs. In the loop, we group row i and the next row by using the “Group” statement.
For i = 1 to 21 step 3
Rows(i & “:” & i+1).Group
Next i
After grouping the rows, we want to see the first level of grouping. So we use the Outline.ShowLevels method to specify the rows level to be displayed in a worksheet. This method has two optional parameters, RowLevels and ColumnLevels. In our case, only the RowLevels parameter is used and it specifies the number of row levels of an outline to display and we want the first row levels to be shown in this case.
ActiveSheet.Outline.ShowLevels RowLevels :=1
Combing all the lines of code together, we get this:
Sub RowsGroup()
Dim i as integer
For i = 1 to 21 step 3
Rows(i & “:” & i+1).Group
Next i
ActiveSheet.Outline.ShowLevels RowLevels :=1
End Sub
By using this method, we can group multiple rows as required without repetitive manual operation.
See you next week for more VBA tips!