
VBA Blogs: Introduction to VBA – Reading Code
3 February 2017
Last week, we talked about recording macros to let you repeat and automate sets of commands. Today, we’re going to look at the code behind those automated commands. Let’s start off looking at a typical block of recorded code:
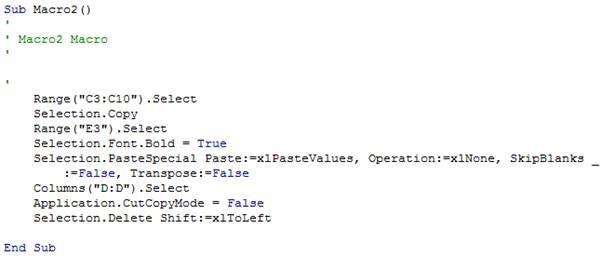
There are a couple of things to learn about how to read macro code:
- Each macro starts with “Sub”, followed by the name of the macro, followed by “()”. Every time you want to set up a macro, this is the format that tells Excel where the code for that macro starts. In later topics, we’ll talk about Functions and explain what the brackets are for. For reference, “Sub” stands for “subroutine”.
- Every macro ends with “End Sub”. This is what tells Excel that the macro that you started earlier should stop here, and that it shouldn’t continue to run things further down the page.
- There are single inverted commas in the first 4-5 lines. These are comments – they’re symbols to tell Excel not to run any code that sits in the line. These are really useful for putting notes into your code to explain how a macro works.
Here’s the slightly tricky bit. Most lines start off with something (e.g. “Selection”), followed by a period (.), followed by another something (e.g. “Copy” or “CutCopyMode”). VBA is what we refer to as an Object Oriented Programming Language. Each of these items represent either an Object that Excel recognises, a Property of the object, or a Method (or action) that can be undertaken.
- Objects are things in Excel. We could be referring to cells, sheets, workbooks, or even the Excel application itself.
- Properties are things that relate to an object. For example, we can look at a cell, and understand that it has:
A value (what is displayed)
A formula (what is seen in the formula bar)
A font type
Border properties
Conditional formatting
All of these are different types of properties. Each object in Excel has different properties. For example, a worksheet has a name, but we can’t apply a type of font to it, unlike a cell range. In the example above, “Font” is a property that belongs to a “Selection”, and even further, we can see that “Bold” is a property that belongs to the “Font”.
- Methods are actions that we can perform to an object. In the example above, we see actions such as “Copy”, “Select”, “PasteSpecial” and “Delete”.
So to make something happen, we might use Object.Method (above: Selection.Copy). Alternatively, if we want to change something or set a particular property, we might use Object.Property = X (above: Selection.Font.Bold = True). If our object was Range(“C4”), and we wanted to change the value, we could say Range(“C4”).Value = “Boom!”.
On that explosive note, next week, we’ll come back with tips on how to refer to cell ranges without blowing up the rest of your spreadsheet. Have fun!
Stay tuned for next week’s update in the series!