
Monday Morning Mulling: February 2020 Challenge
2 March 2020
On the final Friday of each month, we set an Excel problem for you to puzzle over the weekend. On the Monday, we publish a solution. If you think there is an alternative answer, feel free to email us. We’ll feel free to ignore you.
To recap, the problem presented last Friday was to automate the process of grouping rows based on specific headings. Essentially, we have a worksheet in the following format:

and we want to group the worksheet as:
First level:

Second level:
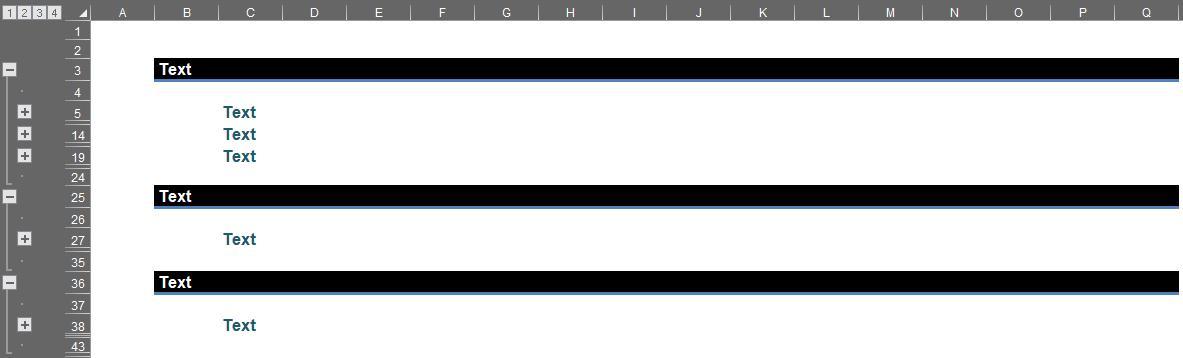
Third level:

Suggested Solution
One simple way here is to group all the rows with used range to the highest level and then ungroup each heading at different levels.
The first step is to define the variables for integers and ranges.
Dim rng As Range
Dim firstRow, lastRow as Integer
If there are existing groupings, we need to expand all rows to avoid potential errors in the following sections of code.
ActiveSheet.Outline.ShowLevels RowLevels:=8, ColumnLevels:=8
Next, we define the starting row and the last row of formula by using the UsedRange method to find the first row and use the total count method to find the last row. The values of rows are assigned to the variables we defined above.
firstRow = ActiveSheet.UsedRange.Row
lastRow = ActiveSheet.UsedRange.Rows(ActiveSheet.UsedRange.Rows.Count).Row
Then, we need to unhide all rows (if any) and clear the existing outline for all rows between the starting row and the last row. Thus, we can remove all existing groupings and get the used range ready for the grouping pattern, as required.
Rows(firstRow & ":" & lastRow).EntireRow.Hidden = False
Rows(firstRow & ":" & lastRow).ClearOutline
Next, we group the rows between first row and last row three (3) times to the fourth (4th) level of grouping. We group all the rows at highest level of grouping and then we can start to ungroup each heading. This is more efficient than selectively grouping.
Rows(firstRow & ":" & lastRow).Rows.Group
Rows(firstRow & ":" & lastRow).Rows.Group
Rows(firstRow & ":" & lastRow).Rows.Group
For the third level of headings, we loop through column D. If the cell’s value in column D is not blank, then we ungroup the row. Thus, the headings in column D will be grouped at third level.
For Each rng In Range("D" & firstRow & ":D" & lastRow)
If Not IsEmpty(rng.Value) Then
rng.Rows.Ungroup
End If
Next
For the second level of headings, we loop through each range in column C. If the cell’s value in column C is not blank, then we ungroup the current row twice and use the Offset function to locate the row above and below the current row and ungroup both rows. Specifically, if there is a heading in column C, we ungroup the row twice to make the headings grouped at second level. The reason why the rows above the current row need to be grouped is because we need to keep a gap between the first heading and the second heading. Therefore, the grouping level at this row should be the same as the second level of headings. As for the rows beneath the current row, we need to ungroup them in order to create the gap between the second level of headings and the third level of headings.
For Each rng In Range("C" & firstRow & ":C" & lastRow)
If Not IsEmpty(rng.Value) Then
rng.Rows.Ungroup
rng.Rows.Ungroup
rng.Offset(1, 0).Rows.Ungroup
rng.Offset(-1, 0).Rows.Ungroup
End If
Next
For the first level of headings, we loop through the column B. If the cell’s value in column B is not blank, then we ungroup the current row three times to make the headings at first level of grouping. Again, we use the Offset function to locate the row above and below the current row and ungroup them twice and once respectively. For the rows above the current row, we need to ungroup twice to make sure that the first levels of headings are adjacent to each other. For the rows beneath the current row, we ungroup them to keep a gap between the first heading and the second heading. Also, we use error handling in the loop. This is because we need to use error handling in this loop so that if there is no outline in the rows defined above, the macro will not return an error and stop at a specific step in the loop. However, the error handling ensures the macro will ignore the rows without outline and continue grouping until the end of loop. Finally, the error handling is closed off with ‘GoTo 0’ syntax.
For Each rng In Range("B" & firstRow & ":B" & lastRow)
If Not IsEmpty(rng.Value) Then
On Error Resume Next
rng.Offset(-1, 0).Rows.Ungroup
rng.Offset(-1, 0).Rows.Ungroup
rng.Offset(1, 0).Rows.Ungroup
rng.Rows.Ungroup
rng.Rows.Ungroup
rng.Rows.Ungroup
On Error GoTo 0
End If
Next
Finally, we point back to the range A1, it helps to reset the worksheet to the top left-hand side.
Range("A1").Select
To combine the components together we obtain:
Sub rowGrouping()
Dim rng As Range
Dim firstRow, lastRow As Integer
'Expand all grouped rows (if any)
ActiveSheet.Outline.ShowLevels RowLevels:=8, ColumnLevels:=8
'Define first row and last row
firstRow = ActiveSheet.UsedRange.Row
lastRow = ActiveSheet.UsedRange.Rows(ActiveSheet.UsedRange.Rows.Count).Row
'Unhide all rows (if any) and clear the outline
Rows(firstRow & ":" & lastRow).EntireRow.Hidden = False
Rows(firstRow & ":" & lastRow).ClearOutline
On Error Resume Next
'Group the rows from first row to last row to grouping level 4
Rows(firstRow & ":" & lastRow).Rows.Group
Rows(firstRow & ":" & lastRow).Rows.Group
Rows(firstRow & ":" & lastRow).Rows.Group
'Ungroup each row in column D that is not empty
For Each rng In Range("D" & firstRow & ":D" & lastRow)
If Not IsEmpty(rng.Value) Then
rng.Rows.Ungroup
End If
Next
'Loop through each range in column C that is not empty
'If the range is not empty, ungroup current row twice
'If the range is not empty, ungroup the rows above and below the current row
For Each rng In Range("C" & firstRow & ":C" & lastRow)
If Not IsEmpty(rng.Value) Then
rng.Rows.Ungroup
rng.Rows.Ungroup
rng.Offset(1, 0).Rows.Ungroup
rng.Offset(-1, 0).Rows.Ungroup
End If
Next
'Loop through each range in column B that is not empty
'If the range is not empty, ungroup the row below current row twice
'If the range is not empty, ungroup the row above current row
'If the range is not empty, ungroup current row three times
For Each rng In Range("B" & firstRow & ":B" & lastRow)
If Not IsEmpty(rng.Value) Then
On Error Resume Next
rng.Offset(-1, 0).Rows.Ungroup
rng.Offset(-1, 0).Rows.Ungroup
rng.Offset(1, 0).Rows.Ungroup
rng.Rows.Ungroup
rng.Rows.Ungroup
rng.Rows.Ungroup
On Error GoTo 0
End If
Next
'Go back to range A1
Range("A1").Select
End Sub
This way, we may group the different level of headings automatically.
There we have it, did you come up with a better solution? Let us know at contact@sumproduct.com. In the meantime, here is the completed file >link to file< for your reference.
The Final Friday Fix will return on Friday 27th March 2020 with a new challenge. In the meantime, please look out for the Daily Excel Tip on our home page and watch out for a new blog every business workday.