Excel for Mac: PivotTable Field Layout
22 December 2023
This week, in our series about Microsoft Excel for Mac, we’ll show you some important PivotTable options that don’t show up in the Field Settings dialog on Mac, even though they are available on Windows, and we’ll show how to work around that limitation.
PivotTables in Excel have three [3] popular layout options:
- Compact (default)
- Tabular
- Outline.
The differences between the layout options are described below. But did you know that you can mix and match these within the same PivotTable? It's useful when you have some fields that work well in one layout, but other fields that work better in a different layout.
To begin, we need to explain why you’d want to use more than one layout option in a PivotTable, and then we’ll explain how this pertains to Excel for Mac. Let's say your data has several fields that all describe the products you’re selling, and you want to find the sum of sales for each. For example, you have fields like manufacturer, product number, name, colour and size, and you’ve added them all to the ‘rows’ area of your PivotTable.
The default layout is the Compact form, which puts each of those fields on a different row, as in the example below:
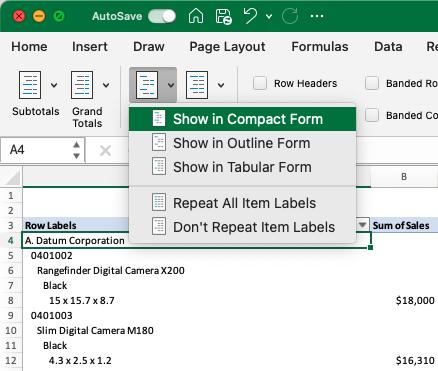
We can see the manufacturer, product number, name, colour and size on different lines. Compact layout keeps the PivotTable narrow by putting all the fields on the Rows section of the PivotTable into one column. Each field is slightly indented from its parent field. It keeps the table narrow, because they’re all in a single column, but it uses four [4] rows for each ‘Sum of sales’ value. We need it to be easier to read and have a neater appearance with less wasted space.
Tabular layout is better for this data, since several fields are used to describe the product for which you’re getting the ‘Sum of sales’. It makes sense to keep them together on a row.
However, you may have other fields such as a manufacturer or category that apply to many products.These would be great to have in Outline form, so they may take up less space. In the Tabular layout example below, "A. Datum Corporation" is on the same line as the product information, but you might want to have it on the line above and move the other fields underneath it to save space.
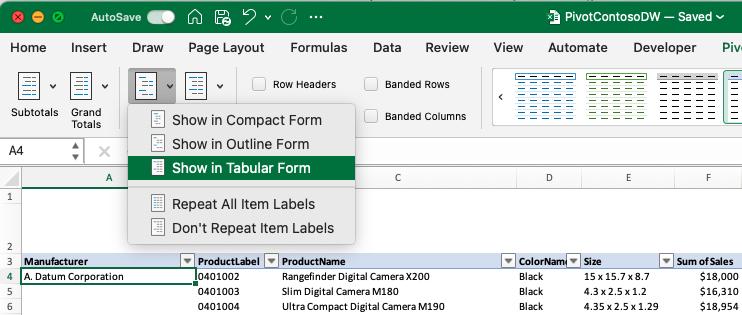
When a standard layout doesn't meet your needs, you can combine layouts. It's simple to do if you’re using Excel for Windows. If you have a Mac, it’s not as easy, but we’re going to show you how to make it easy.
Let’s see how easy this is on Windows. You would just pick the standard layout for the entire PivotTable that gets closest to what you want, and then choose a different layout for specific fields that you want to show differently:
- Go to the ‘PivotTable Design’ tab of the Ribbon -> Report Layout and choose the one that makes sense for most of your fields
- Select the field that should have a different layout and open the ‘Field Settings’ dialog. You can either select a cell with that field in the PivotTable and choose the ‘Field Settings’ button on the Ribbon, or you can open the context menu for the field in your PivotTable fields pane
- On the’ Layout & Print’ tab of the dialog, choose the layout you like best
- Click OK.
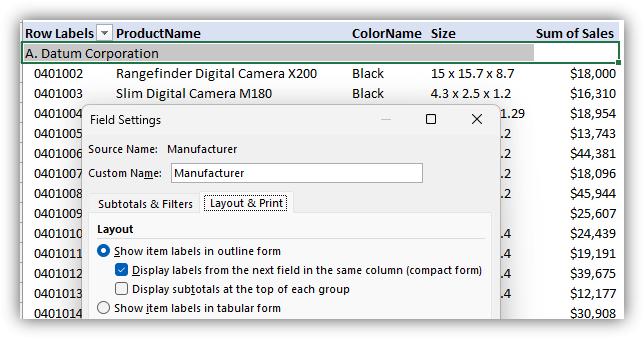
In the example shown here from Windows, the Tabular form has been set for the PivotTable, but then we’ve changed the settings for the Manufacturer field to have Outline form selected and ‘Display labels from the next field in the same column’. This put the Manufacturer field into Compact form, so "A. Datum Corporation" appears on its own line above the products. The rest of the fields stay in Tabular form. It saves space, is easier to read and looks neater.
It’s different on Mac.
Unfortunately, the ‘Layout & Print’ tab of the ‘Field settings’ dialog isn’t available in Excel for Mac (as of September 2023), so how can we set a different layout for the Manufacturer field? This is a good example of when we may need to use a macro. The nice thing about this case is that you don’t need to add the macro to the workbook. It can just be a “personal” macro, so you won’t need to save your file as XLSM, and you won’t get a macro warning when you open it. It will just be saved to your Personal Macro Workbook.
There are a few ways to create a new macro, but we’ll just describe one way here:
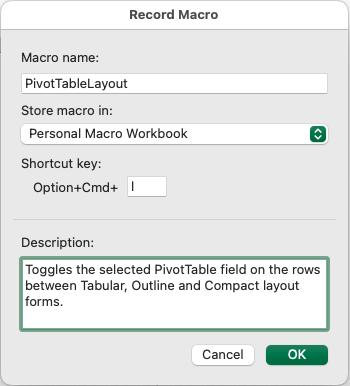
- Record a new macro and in the ‘Macro Name’ field, type “PivotTableLayout”.Choose to store it in ‘Personal Macro Workbook’.If you want to assign a shortcut, type the desired letter in the Shortcut key field.Here we used l(lowercase L), so the shortcut will be OPT + CMD + L to run the macro. Type a description:
- Press OK
- Now press the ‘Stop Recording’ button on the status bar near the bottom left of the Excel window
- Go to Tools menu -> Macro -> Visual Basic Editor
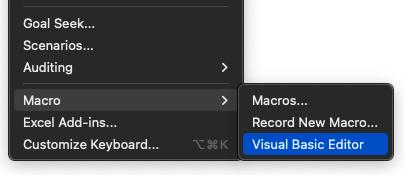
- In the VBE window, select and double-click on the new module that was created when you recorded the macro. If this is your first macro, it will be called ‘Module1’, otherwise it may have a different name

- Copy the code below
- Go back to the Visual Basic Editor, place your cursor in the line above ‘End Sub’ and add a new line. Then paste the code you copied.
'If the user doesn't select a PivotTable cell there will be an error getting the PivotTable name,
'so resume the next command which will give the user a message about it.
On Error Resume Next
Dim ActivePT As String
Dim ActivePTField As String
ActivePT = ActiveCell.PivotCell.Parent.Name
'If the active cell is not in a PivotTable, tell the user to try again.
If ActivePT = "" Then
MsgBox "Select a cell in the rows area of a PivotTable and try again."
Exit Sub
End If
'if the active cell isnot in the Rows section of the PivotTable tell the user to try again.
If ActiveCell.PivotField.Orientation = xlRowField Then
ActivePTField = ActiveCell.PivotField.Name
Else
MsgBox "Select a cell in the rows area and try again."
End If
'If the field is in Tabular form, switch it to Outline (Outline with CompactRow=False)
If (ActiveSheet.PivotTables(ActivePT).PivotFields(ActivePTField).LayoutForm = xlTabular) Then
With ActiveSheet.PivotTables(ActivePT).PivotFields(ActivePTField)
.LayoutForm = xlOutline
.LayoutCompactRow = False
End With
'Exit the sub, since the next step would change the layout again.
Exit Sub
End If
'If the field is in Outline form, switch it to Compact form (CompactRow=True)
If (ActiveSheet.PivotTables(ActivePT).PivotFields(ActivePTField).LayoutForm = xlOutline) And _
(ActiveSheet.PivotTables(ActivePT).PivotFields(ActivePTField).LayoutCompactRow = False) Then
'Switch to compact form by setting CompactRow = True
ActiveSheet.PivotTables(ActivePT).PivotFields(ActivePTField).LayoutCompactRow = True
Else
'Else, it was already in Compact form, so switch back to Tabular form
ActiveSheet.PivotTables(ActivePT).PivotFields(ActivePTField).LayoutForm = xlTabular
End If
Congratulations!
Now you can set your PivotTables to use a combination of layout options that works best for your data. To try your new macro, just go to a PivotTable that has at least two [2] fields in the Rows area. Select a cell in the rows area and run the macro. Hopefully, the ‘Layout & Print’ options will be added to the ‘Field Settings’ dialog on Mac, but until then, this macro will be handy for Mac users.
Here’s an example of what you’ll see in your PivotTable:
- Let’s say you chose Tabular layout for the PivotTable, since that works well for the ProductLabel, ProductName, ColorName, and Size fields. The PivotTable would look like this:

- Run the macro once to switch the first field, Manufacturer, from Tabular to Outline layout. Notice the Manufacturer field is now on a line above the other fields:

- Run the macro again to switch the Manufacturer field to Compact layout, with the next field appearing below the manufacturer name in the same column.

Please come back for future posts in this series, as we cover much more about Excel for Mac.

