
Letting Your Date Leave a Mark on Your Spreadsheet
In this article we look at a common issue: timestamps in Excel. By Liam Bastick, Director with SumProduct Pty Ltd.
Query
Is it possible for my spreadsheet to show the last time the file was modified or saved?
Advice
There are at least three simple solutions to this query.
It should be noted, however, that it all depends on whether you want the file to show when the file was last modified (i.e. when any sort of change was made to the model) or you want to show when the file was last saved.
1. Using a volatile function
Volatile functions are a type of function that will always recalculate, e.g. whenever you press enter, save or use F9. This means that whenever Excel needs to calculate any part of a file, those cells (even if on a different worksheet) containing volatile functions will also recalculate.
Common volatile functions include CELL(), OFFSET(), RAND() and the one I propose to use here NOW(), which delivers the date and time at present.
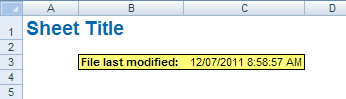
If you type =NOW() into the cell where you wish the date last modified to be displayed, it will change each time a modification is made. This can be highly effective if displayed prominently:
To glean accuracy, I would recommend using the number format d/mm/yyyy h:mm:ss AM/PM for example as the custom format. (To remind yourself about custom number formatting, please click here).
2. Using a range name
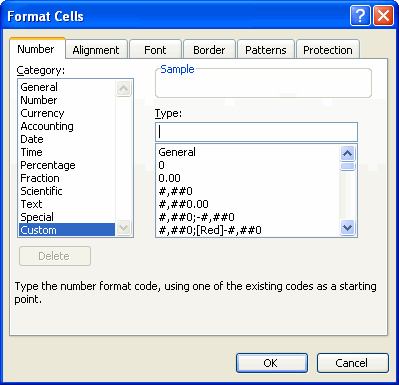
Often, the NOW() formula, although simple will appear as ########## in a workbook because the column is too narrow or because it has not been formatted properly. A simple way to circumvent this is to use a range name instead combined with the TEXT() function. The syntax of TEXT is as follows:
=TEXT(Reference,“Mask”)
The reference is the cell or formula that needs to be formatted and the Mask is the syntax you would enter for Custom number formatting in the Format Cells (CTRL + 1) dialog box:
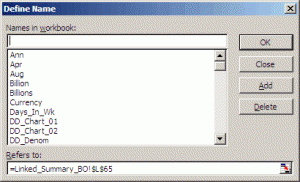
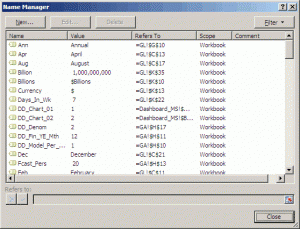
This is used in a range name that we create using ‘Define Name’ in Excel 2003 and through ‘Name Manager’ in Excel 2007 (simply use the keyboard shortcut CTRL + F3, and then if using Excel 2007 or later, click on the ‘New’ button in the ‘Name Manager’ dialog box), viz.
Define Name (Excel 2003 and earlier)
Name Manager (Excel 2007 and later
Ensure where prompted (not all versions of Excel) that you save the range name scope as ‘Workbook’ so that it will be recognised globally in all worksheets.
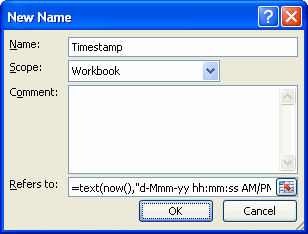
Here, I have typed the following formula (albeit in lower case, which does not matter, it will capitalise automatically) into the ‘Refers to:’ section of the above dialog box:
=TEXT(NOW(),”d-Mmm-yy hh:mm:ss AM/PM”)
Now, instead of typing =NOW() into the cell where you wish the date last modified to be displayed, type =Timestamp instead:
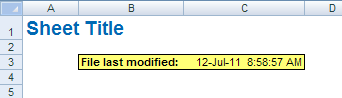
Note I have used a slightly different date format deliberately.
3. Displaying when the file was last saved
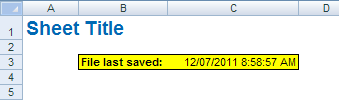
This is slightly trickier and the easiest way I can think of is to use a very simple piece of code. Assuming you wished to put the date and time in the first Excel sheet (i.e. the sheet that Excel originally called ‘Sheet1’) in cell C3 the code would be:

This can be copied from here:
Private Sub Workbook_BeforeSave(ByVal SaveAsUI As Boolean, Cancel As Boolean)
Sheet1.Range("C3").Value = Now
End Sub
For a refresher on how to copy VBA code into the Visual Basic Editor, please see the attached link.
Once a file is saved, depending upon the date formatting incorporated into the cell (see above), it may display as follows:
Do remember…
If you are going to use any of the techniques, ensure:
- The date will be displayed predominantly;
- The file will calculate automatically;
- You save the workbook as a macro-enabled (*.xlsm) workbook in Excel 2007 and later with macros actually enabled; and
- The date and time settings are right on your computer!