
Knowing When Your Number’s Up
This article demystifies the art of manually constructing number formats. By Liam Bastick, associate director with SumProduct Pty Ltd.
Query
I can’t quite get numbers to appear as I would like them to in my Excel spreadsheet. I don’t really understand what all the various symbols mean in the ‘Custom Formats’ section. Can you please help?
Advice
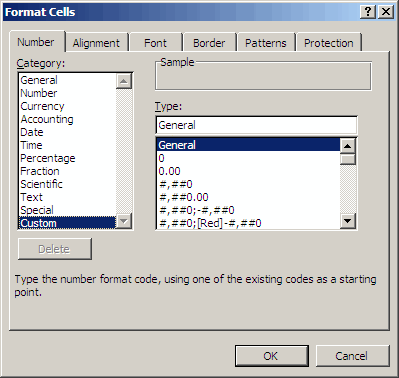
Given that one of the primary purposes of a spreadsheet is to present numerical data, it is important how numerical data is presented. Cells may be individually formatted, using CTRL + 1 or ALT + O + E in all versions of Excel (Excel 2007: Home tab, Cells group, Format -> Format Cells…; Excel 2003 and earlier: Format -> Cells…).
Formatting only changes the appearance, not the underlying value, of a cell. For example, if cells A1 and B1 had the number ‘1.4’ typed in but were formatted to zero decimal places, then if cell C1 = A1 + B1, you would truly have 1 + 1 = 3 (well, 1.4 + 1.4 = 2.8 anyway).
This should not be confused with ‘(Set) precision as displayed’ (Excel 2007: Office Button -> Excel Options -> Advanced -> When calculating this workbook -> Set precision as displayed; earlier Excel versions: Tools -> Options -> Calculation -> Workbook options -> Precision as displayed). Selecting this option and clicking ‘OK’ will permanently change stored values in cells to whatever format has been selected, including the number of decimal places (e.g. 15.75 formatted to one decimal placed would become precisely 15.8).
From the above diagram, Excel has many built-in number formats that are fairly easy to understand, e.g. Currency, Date, Percentage. The default format is ‘General’ where Excel will endeavour to provide the most appropriate format for the contents. For example, typing ‘3 3/4’ into a cell will result in Excel selecting a mixed format.
But what do you do if you can’t find an appropriate format?
Selecting the ‘Custom’ category activates the ‘Type’ input box and allows between 200 and 250 custom number formats in a particular workbook, depending upon the language version of Excel that has been installed.
The ‘Type’ input box allows up to four aspects of formatting to be specified in a cell. These aspects are referred to as sections and are separated by a semi-colon (;). To ascertain what is contained in each section depends on the total number of sections used, viz.
| Number of Sections | Section Details (Assuming No Conditions) |
|---|---|
| 1 (Min) | All numerical values |
| 2 | Non-negative numbers; negative numbers |
| 3 | Positive numbers; negative numbers; zero values |
| 4 (Max) | Positive numbers; negative numbers; zero values; text |
To the uninitiated, coding custom number formats may appear incomprehensible. However, understanding the following tables from Microsoft® soon puts things into perspective. For example:
| Number Code | Description |
|---|---|
| General | General number format |
| 0 | Digit placeholder (0 for ‘padding’) |
| # | Digit placeholder (extra zeros not displayed) |
| ? | Digit placeholder (leaves space for extra zeros, undisplayed) |
| . (decimal pt) | Decimal point |
| % | Percentage displayed |
| , (comma) | Thousands separator |
| / | Delineates numerator / denominator in Fraction category |
| E+, e- etc. | Scientific notation |
Or for text:
| Text Code | Description |
|---|---|
| $ – + / ( ) : space | These characters are displayed in the number |
| “text” | In order to use other characters, enclose in quotation marks |
| \character | or precede them with a backslash |
| * | Repeats next character in format to fill column width |
| _character | Skips the width of the next character |
| @ | Text placeholder |
Or for dates:
| Date Code | Description |
|---|---|
| m | Month as a number without leading zeros (1 to 12) |
| mm | Month as a number with leading zeros (01 to 12) |
| mmm | Month as an abbreviation (Jan – Dec) |
| mmmm | Unabbreviated month (January – December) |
| mmmmm | First letter of month (J, F, M, etc.) |
| d | Day without leading zeros (1 to 31) |
| dd | Day with leading zeros (01 to 31) |
| ddd | Week day as an abbreviation (Sun – Sat) |
| dddd | Unabbreviated week day (Sunday – Saturday) |
| y or yy | Year as a two digit number (e.g. 09, 97) |
| yyy or yyyy | Year as a four digit number (e.g. 2009, 1997) |
Or for time:
| Time Code | Description |
|---|---|
| h | Hours as a number without leading zero (0 to 23) |
| hh | Hours as a number with leading zero (00 to 23) |
| m | Minutes as a number without leading zero (0 to 59) |
| mm | Minutes as a number with leading zero (00 to 59) |
| s | Seconds as a number without leading zero (0 to 59) |
| ss | Seconds as a number with leading zero (00 to 59) |
| [h] | With times only, will increment to 24 hours and beyond |
| [m] | With times only, will increment to 60 minutes and beyond |
| [s] | With times only, will increment to 60 seconds and beyond |
| AM/PM am/pm | Time based on 12hr clock (rather than 24hr default) |
Or for miscellaneous:
| Miscellaneous Code | Description |
|---|---|
| [Black] [Blue] [Cyan] [Green] [Magenta] [Red] [White] [Yellow] | Displays the characters in the specified colours |
| [Color n] | Displays the nth colour (1 to 56) in the color palette |
| ; (semi-colon) | Delineates a section |
| [Condition Value] | <, >, <=, >=, =, <> with a value to represent a condition A number format may contain up to two conditions |
This article’s attached Excel file contains numerous formatting examples. However, I will explain one or two here.
Example 1
[Blue]$* _(#,##0.0,_0_);[Red]$* (#,##0.00,);[Color 7]\-_._0_0_);[Cyan]@*.”is text”
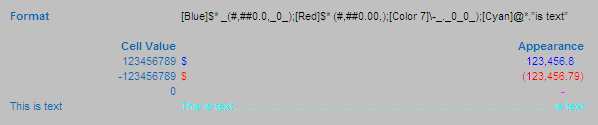
This format has all four sections, so the first section, [Blue]$* _(#,##0.0,_0_), specifies the formatting for positive numbers. In this case, positive numbers will be formatted blue and be preceded with a $ sign. Note the use of the asterisk followed by a space: this means that the cell width will be ‘padded out’ with spaces so that the dollar sign will be pushed to the very left of the cell and the number formatting will be to the very right. _( is not necessary, strictly speaking, but ensures there is space made for an open bracket, even though there is no such character shown. #,##0.0, ensures positive numbers contain thousand separators (where needed) and displays the number to the nearest 0.1 of a thousand. Two commas at the end would have the number displayed to the nearest 0.1 of a million, and so on. Finally, the _0_) requires Excel to maintain enough space at the right end of a cell for a digit (not necessarily zero and a close bracket). It should be noted that a separate underscore is required for each character that is to be allowed for.
The second section, [Red]$* (#,##0.00,), specifies the formatting for negative numbers. It is similar to the first section, but colours the number red, reports numbers to 0.01 of a thousand and encloses it in brackets.
The third section, [Color 7]\-_._0_0_), specifies the formatting for zero values. This colours zero values “Color 7” which is a delightful pink in Excel’s standard color palette. I am a great believer in using a dash, generated by using \- here, to denote zero as it distinguishes a zero value from something that is approximately zero, which can be useful for error checking, etc. The final four underscored characters, _._0_0_), ensure that the dash will line up with the units value of a positive or negative value.
Finally, the fourth section, [Cyan]@*.”is text”, defines how text is to be formatted. If omitted, text is simply formatted ‘generally’, but here it will be coloured cyan. The @ symbol specifies the relative location of the text within the cell (left-hand side of the cell), the *. will ‘fill’ the cell with period characters and “is text” will add these words to the end of the text, right-aligned (note no ‘&’ concatenation is required since these words appear in the formatting only).
Example 2 (‘Hiding’ a Cell)
;;;
Colouring the font and the background the same may hide a cell’s contents on screen, but it will often reappear when printed out (especially if ‘black and white printing’ is selected). By choosing the above formatting, numbers and text are simply ‘blanked out’ and will only appear in Excel’s formula bar instead.
Example 3 (‘Conditional Formatting’ in a Cell)
[>=1000000]#,##0,,”M”;[>=1000]#,##0,”K”;0
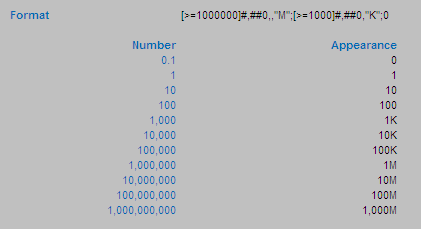
Above, I mentioned what the four sections ‘generally’ mean. This third example highlights that this is not always the case. Custom number formats allow up to two conditions to be specified. This is because only four sections are allowed for custom number formatting and two are reserved. The fourth section always specifies text formatting and one other section is required to detail how ‘everything else’ (numerically) will be formatted.
The conditions are included in square brackets such that if the condition is true, the following formatting will be applied.
In this example, there are only three sections, so text will be formatted ‘generally’. The first section, [>=1000000]#,##0,,”M”, will format all numbers greater than or equal to a million to the nearest million and add an “M” to the end of the number.
The second section will only be considered if the first condition is not true, so the order of the two ‘conditional formats’ needs to be thought through. Here, the second section, [>=1000]#,##0,”K”, will format all numbers greater than or equal to a thousand (but necessarily less than a million) to the nearest thousand and add a “K” to the end of the number.
The third and final section, 0, will format all other numbers (every value less than 1,000) to the nearest integer without thousands separator(s).
Use With Caution
Using lots of custom number formats in a single workbook uses considerable memory and can slow down the calculation time of an Excel file unnecessarily. Many of these formats are created accidentally. Each time a custom number format is edited, it will generate an additional listing for Custom Category Types. Any custom formats created inadvertently in this manner (that are not being used in the file) should be deleted; good house-keeping is essential.
If you have a query for this section, please feel free to drop Liam a line at liam.bastick@sumproduct.com or visit the website www.sumproduct.com